Difference between revisions of "Mesh/WalkThrough"
(changed the wording a bit) |
(adds troubleshooting and reset button soldering section) |
||
| (201 intermediate revisions by 20 users not shown) | |||
| Line 1: | Line 1: | ||
'''Congratulations''' on choosing to become part of the [https://peoplesopen.net/ People's Open Network]! | |||
Continue reading to follow these do-it-yourself / do-it-together instructions, or read more about [[Mesh#How_To_Participate|how to participate and get help]]. | |||
= Summary = | |||
This is a [[Mesh/WalkThrough#linkback|WalkThrough]] to install a custom operating system on a compatible network device for use as a '''node''' (e.g. your home router) on the network. You will learn how to flash Sudo Mesh's [https://github.com/sudomesh/sudowrt-firmware sudowrt-firmware] (a custom build of [https://openwrt.org/ OpenWRT]) and then configure it. | |||
At the end of this walkthrough, you'll be able to plug in your router and join the mesh. '''Note:''' In order to access the internet, you will likely need your own connection with an existing Internet Service Provider (ISP), or otherwise be located near [https://peoplesopen.net/map/ another mesh node with its own route to the internet]. | |||
= Prerequisites = | |||
This walkthrough assumes you're using linux or another unix-like operating system (such as Mac OS X, Ubuntu, FreeBSD, etc) and that you have [https://help.ubuntu.com/community/UsingTheTerminal basic knowledge of the command-line interface terminal] ('terminal' for short). [https://github.com/sudomesh/sudowrt-firmware/issues/new Contact us] if you can contribute instructions for other systems. | |||
The general idea of building your own mesh node consists of three steps: | |||
# [[#Download/Build|downloading or compiling]] the custom firmware | |||
# [[#Flash/Upload|flashing that firmware]] to the node (i.e. copying firmware to [https://en.wikipedia.org/wiki/Flash_memory '''flash''' memory]) | |||
# [[#Configure|configuring the node]] to function as part of a mesh. | |||
Before you flash your router, it is recommended that you read the [[Home and extender nodes#Home_nodes|home node info]] to ensure your router is compatible to work as a mesh node. | |||
= Download/Build = | |||
Now that you have a node, you can flash it with the latest sudowrt-firmware. The first step is to download the firmware image file for your supported router. At the moment, we are supporting the following firmware builds: | |||
[ | {| class="wikitable" | ||
! Name !! OpenWRT Doc !! Firmware Image | |||
|- | |||
| Western Digital MyNet N600 || [https://wiki.openwrt.org/toh/wd/n600 OpenWRT Docs] || '''[https://builds.sudomesh.org/sudowrt-firmware/0.3.0/ar71xx/openwrt-ar71xx-generic-mynet-n600-squashfs-factory-0.3.0.bin 0.3.0]''' [https://zenodo.org/record/1205601/files/openwrt-ar71xx-generic-mynet-n600-squashfs-factory.bin 0.2.3] [https://builds.sudomesh.org/sudowrt-firmware/0.2.2/ar71xx/openwrt-ar71xx-generic-mynet-n600-squashfs-factory.bin 0.2.2][https://builds.sudomesh.org/sudowrt-firmware/0.2.0/ar71xx/openwrt-ar71xx-generic-mynet-n600-squashfs-factory.bin 0.2.0] | |||
|- | |||
| Western Digital MyNet N750 || [https://wiki.openwrt.org/toh/wd/n750 OpenWRT Docs] || | |||
'''[https://zenodo.org/record/1205601/files/openwrt-ar71xx-generic-mynet-n750-squashfs-factory.bin latest]''' | |||
[https://zenodo.org/record/1205601/files/openwrt-ar71xx-generic-mynet-n750-squashfs-factory.bin 0.2.3] | |||
[https://builds.sudomesh.org/sudowrt-firmware/0.2.2/ar71xx/openwrt-ar71xx-generic-mynet-n750-squashfs-factory.bin 0.2.2][https://builds.sudomesh.org/sudowrt-firmware/0.2.0/ar71xx/openwrt-ar71xx-generic-mynet-n750-squashfs-factory.bin 0.2.0] | |||
|- | |||
| TP-Link WDR3500 || [https://wiki.openwrt.org/toh/tp-link/tl-wdr3500 OpenWRT Docs] || | |||
'''[https://zenodo.org/record/1205601/files/openwrt-ar71xx-generic-tl-wdr3500-v1-squashfs-factory.bin latest]''' | |||
[https://zenodo.org/record/1205601/files/openwrt-ar71xx-generic-tl-wdr3500-v1-squashfs-factory.bin 0.2.3] | |||
[https://builds.sudomesh.org/sudowrt-firmware/0.2.2/ar71xx/openwrt-ar71xx-generic-tl-wdr3500-v1-squashfs-factory.bin 0.2.2] [https://builds.sudomesh.org/sudowrt-firmware/0.2.0/ar71xx/openwrt-ar71xx-generic-tl-wdr3500-v1-squashfs-factory.bin 0.2.0] | |||
|- | |||
| TP-Link WDR3600 || [https://wiki.openwrt.org/toh/tp-link/tl-wdr3600 OpenWRT Docs] || | |||
'''[https://zenodo.org/record/1205601/files/openwrt-ar71xx-generic-tl-wdr3600-v1-squashfs-factory.bin latest]''' | |||
[https://zenodo.org/record/1205601/files/openwrt-ar71xx-generic-tl-wdr3600-v1-squashfs-factory.bin 0.2.3] | |||
[https://builds.sudomesh.org/sudowrt-firmware/0.2.2/ar71xx/openwrt-ar71xx-generic-tl-wdr3600-v1-squashfs-factory.bin 0.2.2][https://builds.sudomesh.org/sudowrt-firmware/0.2.0/ar71xx/openwrt-ar71xx-generic-tl-wdr3600-v1-squashfs-factory.bin 0.2.0] | |||
|- | |||
| TP-Link WDR4300 || [https://wiki.openwrt.org/toh/tp-link/tl-wdr4300 OpenWRT Docs] || | |||
'''[https://zenodo.org/record/1205601/files/openwrt-ar71xx-generic-tl-wdr4300-v1-squashfs-factory.bin latest]''' | |||
[https://zenodo.org/record/1205601/files/openwrt-ar71xx-generic-tl-wdr4300-v1-squashfs-factory.bin 0.2.3] | |||
[https://builds.sudomesh.org/sudowrt-firmware/0.2.2/ar71xx/openwrt-ar71xx-generic-tl-wdr4300-v1-squashfs-factory.bin 0.2.2][https://builds.sudomesh.org/sudowrt-firmware/0.2.0/ar71xx/openwrt-ar71xx-generic-tl-wdr4300-v1-squashfs-factory.bin 0.2.0] | |||
|- | |||
|} | |||
Builds for other routers can be found on our [http://builds.sudomesh.org/sudowrt-firmware/ builds server] or on [https://doi.org/10.5281/zenodo.1205601 zenodo], though most builds for routers not listed above have not been tested. For release notes, please go to our [https://github.com/sudomesh/sudowrt-firmware/releases github release pages]. | |||
Alternatively, you can build your own copy of the firmware images by following the guide in the [https://github.com/sudomesh/sudowrt-firmware sudowrt-firmware source]. | |||
If you do not want to use Sudo Mesh's OpenWRT image, you can also install [https://downloads.openwrt.org/ a standard OpenWRT] release and configure it from scratch, ([https://github.com/sudomesh/sudowrt-firmware read more on github]). | |||
= Flash/Upload = | |||
Once you have a copy of the sudowrt-firmware intended for your router, you can proceed with flashing it to your router. There are different techniques for flashing each of the routers. Use the links above to the OpenWRT wiki and follow the instructions there to flash the router with the firmware you've downloaded. | |||
For convenience, if you have a Western Digital MyNet N600 or N750, follow these instructions: | |||
== | == Reset your new N750/N600 router == | ||
* | [[File:Router_reset_mynet.png|200px|thumb|right|Reset hole location!]] | ||
* | Instructions to reset / default a WD MyNet N600 or N750 router: | ||
* Plug one end of the Ethernet cable into your laptop. | |||
* | * Plug the other end of the Ethernet cable into one of the normal ports (LAN) on the router (not the Internet/WAN port). | ||
* With the router plugged in and power turned off, push a pin / paperclip / tiny screwdriver into the reset hole and hold it for at least 15 seconds. Keep another hand free. | |||
* With the pin still held down, turn on the router power button. | |||
* Watch the front blue light - they will flash on and off a few times. | |||
* Once the front blue is flashing, you can let go of the pin. | |||
== | == Configure your computer's network settings == | ||
On your laptop edit your network settings to reflect the following: | |||
* | * Network Manager Method: Manual | ||
*: <code> | * IP Address: <code>192.168.1.10</code> (some devices will only accept from this IP) | ||
*: <code> | * Subnet Mask: <code>255.255.255.0</code> | ||
*: <code> | * Gateway: <code>0.0.0.0</code> (Or leave blank) | ||
You can also use the commands: | |||
sudo ip link set <eth_interface> down | |||
sudo ip addr add 192.168.1.10/24 dev <eth_interface> | |||
sudo ip link set <eth_interface> up | |||
where <code><eth_interface></code> is the name of your ethernet interface found using the <code>ip addr</code> command (common names include <code>eth0</code>, <code>enp3s0</code>, ...) | |||
See Network Configuration Guides: [[Mesh/Network%20Configuration%20for%20Linux | Linux]], [[Mesh/Network%20Configuration%20for%20MacOS%20X | Mac]] | |||
== Upload sudowrt-firmware == | |||
In your web browser: | |||
* Go to [http://192.168.1.1 http://192.168.1.1], if the reset was successful, you should see the following page: | |||
[[File:Screenshot from 2017-04-04 18-27-09.png|thumb|center|upright=2]] | |||
* If your reset was not successful, try debugging your network configuration described in the previous step. | |||
** If you continue to have issues consider reloading network settings or restarting your computer. | |||
** If you are still unable to access this firmware upload page, turn off your router and try to reset it again as instructed above. | |||
* Click 'Browse' and select the firmware file you downloaded | |||
* Click Upload and you will be taken to an exciting countdown timer: | |||
[[File:Screenshot from 2017-04-02 17-20-51.png|thumb|center|upright=2]] | |||
* Make sure not to disconnect or lose power at this stage, wait for the timer to complete. | |||
You | '''Note:''' Sometimes the firmware upload will not complete correctly. After you click on 'Upload' You should get a page with a countdown of 120+ seconds. If this does not occur, reboot the router with the pin reset button depressed (as noted above), and try again. | ||
= Configure = | |||
'''''If you are configuring something other than a WD MyNet N600, or firmware version 0.2.3 or earlier, follow ([[#Makenode_.28v.0.2.3_and_earlier.29|these instructions]])''''' | |||
[[File:Nodeports titles.png|400px|thumb|right|Plug into port 3 to access the private network from your laptop. Port 2 connects to the public 'peoplesopen.net' network]] | |||
# Connect your newly-flashed MyNet N600 to your existing Internet router via ethernet cable from your existing router's '''LAN port''' to your new node's '''Internet port'''. | |||
# Wait several minutes for your new node autoconfigure, connect to the Internet, and obtain its private IP address from the sudo mesh build server. When this process is complete, the node should broadcast several WiFi networks with the following SSIDs and purposes: | |||
#* <code>peoplesopen.net</code> - This is the public network broadcast on the 2.4ghz band; it has no password, and is suitable for access to the internet. | |||
#* <code>peoplesopen.net fast</code> - This is the same public network, but broadcast on the 5ghz band, which is more ideal for high-bandwidth activities such as streaming media. | |||
#* <code>peoplesopen.net-node2node</code> - This is the public network used for mesh nodes to discover and communicate with one another. You should not need to connect or use this network, but you will want to verify it is active. | |||
#* <code>pplsopen-admin</code> This is the private network, and you can use it to access a web dashboard to configure some settings, such as its SSID. The default WiFi password is <code>meshtheworld</code>. Try connecting to it (you can also connect to the private network using an ethernet cable connected to '''port 3''' on an N600 -- see diagram for details). | |||
Learn more about the [[Mesh/Network topology|network's topology here]]. | |||
== Configuring the Web Dashboard == | |||
While connected to the ''private'' network (default <code>pplsopen-admin</code>), try connecting to the home node's web dashboard by opening a web browser and navigating to [http://172.30.0.1 172.30.0.1] | |||
If the flash was successful you should be brought to the following screen: | |||
[[File:Peoplesopen-dash.jpg|frame|center|upright=2]] | |||
The default password is <code>meshtheplanet</code>. | |||
Here you can set the amount of downstream and upstream bandwidth you're willing to share on the public <code>peoplesopen.net</code> network (default is set to 4096kb, or roughly 4 megabits/second): | |||
[[File:homeScreen.jpg|frame|center|upright=2]] | |||
[[File:WifiSettings.jpg|frame|left|upright=2|Set your private SSID and password via the 'WIFi Settings' tab. NOTE: When you first set your private SSID name and hit 'Save', you will have to reconnect to the newly-named SSID using the original default password (<code>meshtheworld</code>) and then reconnect again with the new password after setting it in the dashboard]] [[File:newrouter.png|frame|right|upright=2|See all devices connected to your node via the 'Connections' tab]] | |||
<br clear=all> | |||
== | == Changing Admin and Root User Passwords == | ||
'''''Note: If you would like to be able to change the above wifi settings in the future, or ssh into your router, you will need to change the admin and root passwords within 12 hours.''''' | |||
To do so, open a terminal while connected to the <code>pplsopen-admin</code> private network (or whatever new SSID you may have chosen): | |||
ssh root@172.30.0.1 | |||
Enter the following password: <code>meshtheplanet</code> | |||
Set the root password. | |||
passwd | |||
Now set the admin password for logging into the web dashboard: | |||
passwd admin | |||
== Testing == | |||
After you're finished with the flashing and configuration, your home node should be available for connections via your private WiFi SSID (default <code>pplsopen-admin</code>). Additionally the public SSIDs <code>peoplesopen.net <your mesh IP></code> and <code>peoplesopen.net fast <your mesh IP></code> will be available. It should also be populated on the [https://peoplesopen.herokuapp.com monitor]! | |||
A fourth interface named <code>pplsopen.net-node2node</code> will be detectable as well. This is the interface used for the nodes to mesh with each other. | |||
At this point you're setup. Reach out to the [[Mesh#How_To_Participate|rest of the network]]! | |||
and | == Makenode (v.0.2.3 and earlier) == | ||
'''''Note: If you installed autoconfiguring [https://github.com/sudomesh/sudowrt-firmware/releases/tag/0.3.0 release 0.3.0] for myNet N600 routers, you do not need to use makenode. See the autoconf instructions above.''''' | |||
Makenode's documentation has been consolidated to [[Mesh/Makenode|its page.]] | |||
= Flashing TP-Link Routers = | |||
If you happen to come across a TP-Link router, such as a WDR4300, you may discover that the above instructions absolutely do not work. This is especially true if the router has previously been flashed with the sudowrt firmware (or any kind of OpenWRT or DD-WRT?). If you find yourself attempting to reflash a TP-Link router, you will first need to reset the router to its factory default firmware. Luckily, redconfetti has provided instructions on how to do this, http://www.rubycoloredglasses.com/2016/04/tp-link-wdr4300-recovery/ (TODO, test/update these instructions and copy them to this wiki) | |||
Next, upload the sudort-firmware manually through the router's gui? Presumably, I haven't gotten that far yet... | |||
After that, makenode should just work right? | |||
There also exists something called tp-flasher, https://github.com/sudomesh/tp-flasher. However, it is highly recommended that you avoid using this because there is a very good chance you will brick your router if you use it incorrectly. Of course, we don't want to discourage anyone from improving tp-flasher. | |||
= Flashing Extender Nodes = | |||
If you would like to make long distance point-to-point connections between two or more home nodes, you'll want to setup an extender node (a roof mounted antenna). | |||
See [[Mesh/Flashing extender nodes]] | |||
[[Category:Mesh]] | |||
= Troubleshooting = | |||
== Soldering A Reset Button == | |||
As you are resetting routers, you may end up having a component, such as the reset button itself, fall off of the PCB (printed circuit board). The WD MyNet n600 has security screws, so you may need a [https://www.google.com/search?hl=en&ei=Zz30XZ-iLurJ0PEP8Mq90As&q=site%3Aaliexpress.com+torx+t10+security+bit&oq=site%3Aaliexpress.com+torx+t10+security+bit&gs_l=psy-ab.3...15707.23122..23261...0.0..2.605.6423.23j13j6j1j1j1......0....1..gws-wiz.......0i273j0j0i131j0i67.SQrobDcWg6U&ved=0ahUKEwjf8eHvgLTmAhXqJDQIHXBlD7oQ4dUDCAs&uact=5 Torx T10 Security Bit] to remove the case. | |||
<gallery mode="traditional"> | |||
File:Wd_n600_naked_board.jpg|WD MyNet n600 naked (without case) | |||
File:Wd_n600_reset_button_resolder.jpg|WD MyNet n600 resolder of the reset button that fell off | |||
</gallery> | |||
< | |||
= | |||
</ | |||
Latest revision as of 18:39, 13 December 2019
Congratulations on choosing to become part of the People's Open Network!
Continue reading to follow these do-it-yourself / do-it-together instructions, or read more about how to participate and get help.
Summary
This is a WalkThrough to install a custom operating system on a compatible network device for use as a node (e.g. your home router) on the network. You will learn how to flash Sudo Mesh's sudowrt-firmware (a custom build of OpenWRT) and then configure it.
At the end of this walkthrough, you'll be able to plug in your router and join the mesh. Note: In order to access the internet, you will likely need your own connection with an existing Internet Service Provider (ISP), or otherwise be located near another mesh node with its own route to the internet.
Prerequisites
This walkthrough assumes you're using linux or another unix-like operating system (such as Mac OS X, Ubuntu, FreeBSD, etc) and that you have basic knowledge of the command-line interface terminal ('terminal' for short). Contact us if you can contribute instructions for other systems.
The general idea of building your own mesh node consists of three steps:
- downloading or compiling the custom firmware
- flashing that firmware to the node (i.e. copying firmware to flash memory)
- configuring the node to function as part of a mesh.
Before you flash your router, it is recommended that you read the home node info to ensure your router is compatible to work as a mesh node.
Download/Build
Now that you have a node, you can flash it with the latest sudowrt-firmware. The first step is to download the firmware image file for your supported router. At the moment, we are supporting the following firmware builds:
| Name | OpenWRT Doc | Firmware Image |
|---|---|---|
| Western Digital MyNet N600 | OpenWRT Docs | 0.3.0 0.2.3 0.2.20.2.0 |
| Western Digital MyNet N750 | OpenWRT Docs | |
| TP-Link WDR3500 | OpenWRT Docs | |
| TP-Link WDR3600 | OpenWRT Docs | |
| TP-Link WDR4300 | OpenWRT Docs |
Builds for other routers can be found on our builds server or on zenodo, though most builds for routers not listed above have not been tested. For release notes, please go to our github release pages.
Alternatively, you can build your own copy of the firmware images by following the guide in the sudowrt-firmware source.
If you do not want to use Sudo Mesh's OpenWRT image, you can also install a standard OpenWRT release and configure it from scratch, (read more on github).
Flash/Upload
Once you have a copy of the sudowrt-firmware intended for your router, you can proceed with flashing it to your router. There are different techniques for flashing each of the routers. Use the links above to the OpenWRT wiki and follow the instructions there to flash the router with the firmware you've downloaded.
For convenience, if you have a Western Digital MyNet N600 or N750, follow these instructions:
Reset your new N750/N600 router

Instructions to reset / default a WD MyNet N600 or N750 router:
- Plug one end of the Ethernet cable into your laptop.
- Plug the other end of the Ethernet cable into one of the normal ports (LAN) on the router (not the Internet/WAN port).
- With the router plugged in and power turned off, push a pin / paperclip / tiny screwdriver into the reset hole and hold it for at least 15 seconds. Keep another hand free.
- With the pin still held down, turn on the router power button.
- Watch the front blue light - they will flash on and off a few times.
- Once the front blue is flashing, you can let go of the pin.
Configure your computer's network settings
On your laptop edit your network settings to reflect the following:
- Network Manager Method: Manual
- IP Address:
192.168.1.10(some devices will only accept from this IP) - Subnet Mask:
255.255.255.0 - Gateway:
0.0.0.0(Or leave blank)
You can also use the commands:
 sudo ip link set <eth_interface> down
 sudo ip addr add 192.168.1.10/24 dev <eth_interface>
 sudo ip link set <eth_interface> up
where <eth_interface> is the name of your ethernet interface found using the ip addr command (common names include eth0, enp3s0, ...)
See Network Configuration Guides: Linux, Mac
Upload sudowrt-firmware
In your web browser:
- Go to http://192.168.1.1, if the reset was successful, you should see the following page:

- If your reset was not successful, try debugging your network configuration described in the previous step.
- If you continue to have issues consider reloading network settings or restarting your computer.
- If you are still unable to access this firmware upload page, turn off your router and try to reset it again as instructed above.
- Click 'Browse' and select the firmware file you downloaded
- Click Upload and you will be taken to an exciting countdown timer:

- Make sure not to disconnect or lose power at this stage, wait for the timer to complete.
Note: Sometimes the firmware upload will not complete correctly. After you click on 'Upload' You should get a page with a countdown of 120+ seconds. If this does not occur, reboot the router with the pin reset button depressed (as noted above), and try again.
Configure
If you are configuring something other than a WD MyNet N600, or firmware version 0.2.3 or earlier, follow (these instructions)

- Connect your newly-flashed MyNet N600 to your existing Internet router via ethernet cable from your existing router's LAN port to your new node's Internet port.
- Wait several minutes for your new node autoconfigure, connect to the Internet, and obtain its private IP address from the sudo mesh build server. When this process is complete, the node should broadcast several WiFi networks with the following SSIDs and purposes:
peoplesopen.net- This is the public network broadcast on the 2.4ghz band; it has no password, and is suitable for access to the internet.peoplesopen.net fast- This is the same public network, but broadcast on the 5ghz band, which is more ideal for high-bandwidth activities such as streaming media.peoplesopen.net-node2node- This is the public network used for mesh nodes to discover and communicate with one another. You should not need to connect or use this network, but you will want to verify it is active.pplsopen-adminThis is the private network, and you can use it to access a web dashboard to configure some settings, such as its SSID. The default WiFi password ismeshtheworld. Try connecting to it (you can also connect to the private network using an ethernet cable connected to port 3 on an N600 -- see diagram for details).
Learn more about the network's topology here.
Configuring the Web Dashboard
While connected to the private network (default pplsopen-admin), try connecting to the home node's web dashboard by opening a web browser and navigating to 172.30.0.1
If the flash was successful you should be brought to the following screen:

The default password is meshtheplanet.
Here you can set the amount of downstream and upstream bandwidth you're willing to share on the public peoplesopen.net network (default is set to 4096kb, or roughly 4 megabits/second):


meshtheworld) and then reconnect again with the new password after setting it in the dashboard
Changing Admin and Root User Passwords
Note: If you would like to be able to change the above wifi settings in the future, or ssh into your router, you will need to change the admin and root passwords within 12 hours.
To do so, open a terminal while connected to the pplsopen-admin private network (or whatever new SSID you may have chosen):
ssh root@172.30.0.1
Enter the following password: meshtheplanet
Set the root password.
passwd
Now set the admin password for logging into the web dashboard:
passwd admin
Testing
After you're finished with the flashing and configuration, your home node should be available for connections via your private WiFi SSID (default pplsopen-admin). Additionally the public SSIDs peoplesopen.net <your mesh IP> and peoplesopen.net fast <your mesh IP> will be available. It should also be populated on the monitor!
A fourth interface named pplsopen.net-node2node will be detectable as well. This is the interface used for the nodes to mesh with each other.
At this point you're setup. Reach out to the rest of the network!
Makenode (v.0.2.3 and earlier)
Note: If you installed autoconfiguring release 0.3.0 for myNet N600 routers, you do not need to use makenode. See the autoconf instructions above.
Makenode's documentation has been consolidated to its page.
Flashing TP-Link Routers
If you happen to come across a TP-Link router, such as a WDR4300, you may discover that the above instructions absolutely do not work. This is especially true if the router has previously been flashed with the sudowrt firmware (or any kind of OpenWRT or DD-WRT?). If you find yourself attempting to reflash a TP-Link router, you will first need to reset the router to its factory default firmware. Luckily, redconfetti has provided instructions on how to do this, http://www.rubycoloredglasses.com/2016/04/tp-link-wdr4300-recovery/ (TODO, test/update these instructions and copy them to this wiki)
Next, upload the sudort-firmware manually through the router's gui? Presumably, I haven't gotten that far yet...
After that, makenode should just work right?
There also exists something called tp-flasher, https://github.com/sudomesh/tp-flasher. However, it is highly recommended that you avoid using this because there is a very good chance you will brick your router if you use it incorrectly. Of course, we don't want to discourage anyone from improving tp-flasher.
Flashing Extender Nodes
If you would like to make long distance point-to-point connections between two or more home nodes, you'll want to setup an extender node (a roof mounted antenna).
See Mesh/Flashing extender nodes
Troubleshooting
Soldering A Reset Button
As you are resetting routers, you may end up having a component, such as the reset button itself, fall off of the PCB (printed circuit board). The WD MyNet n600 has security screws, so you may need a Torx T10 Security Bit to remove the case.
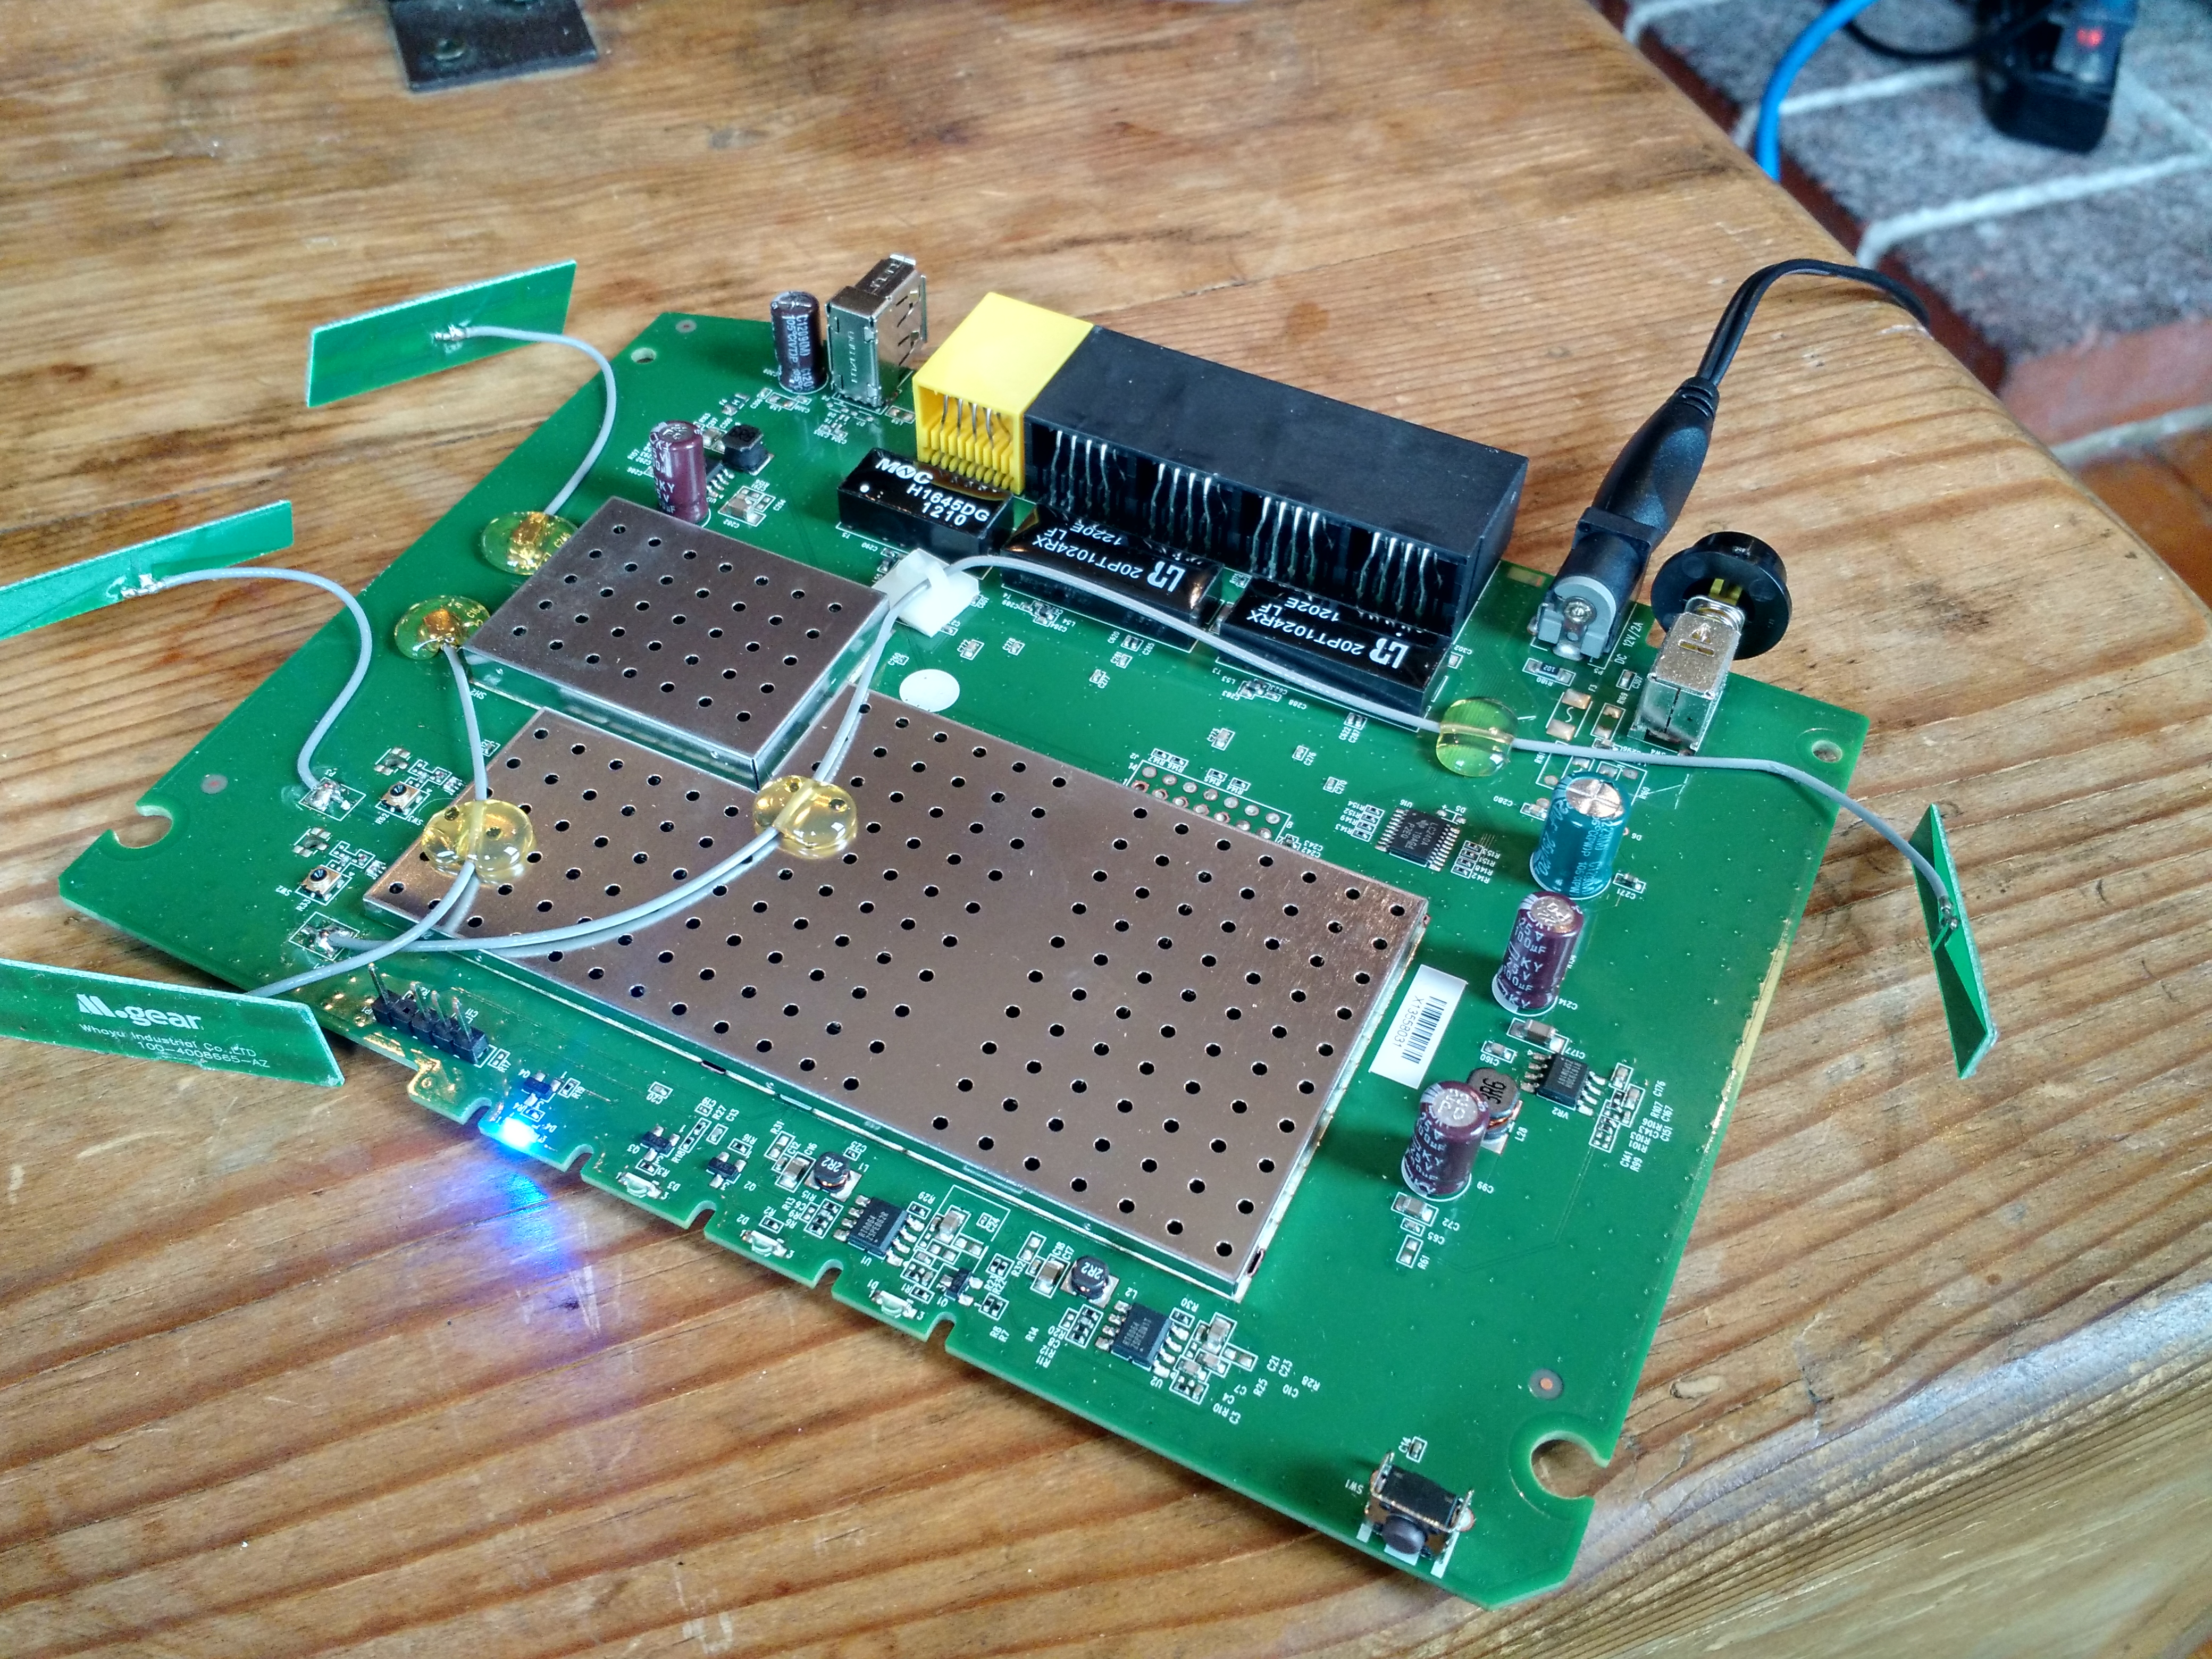
WD MyNet n600 naked (without case)
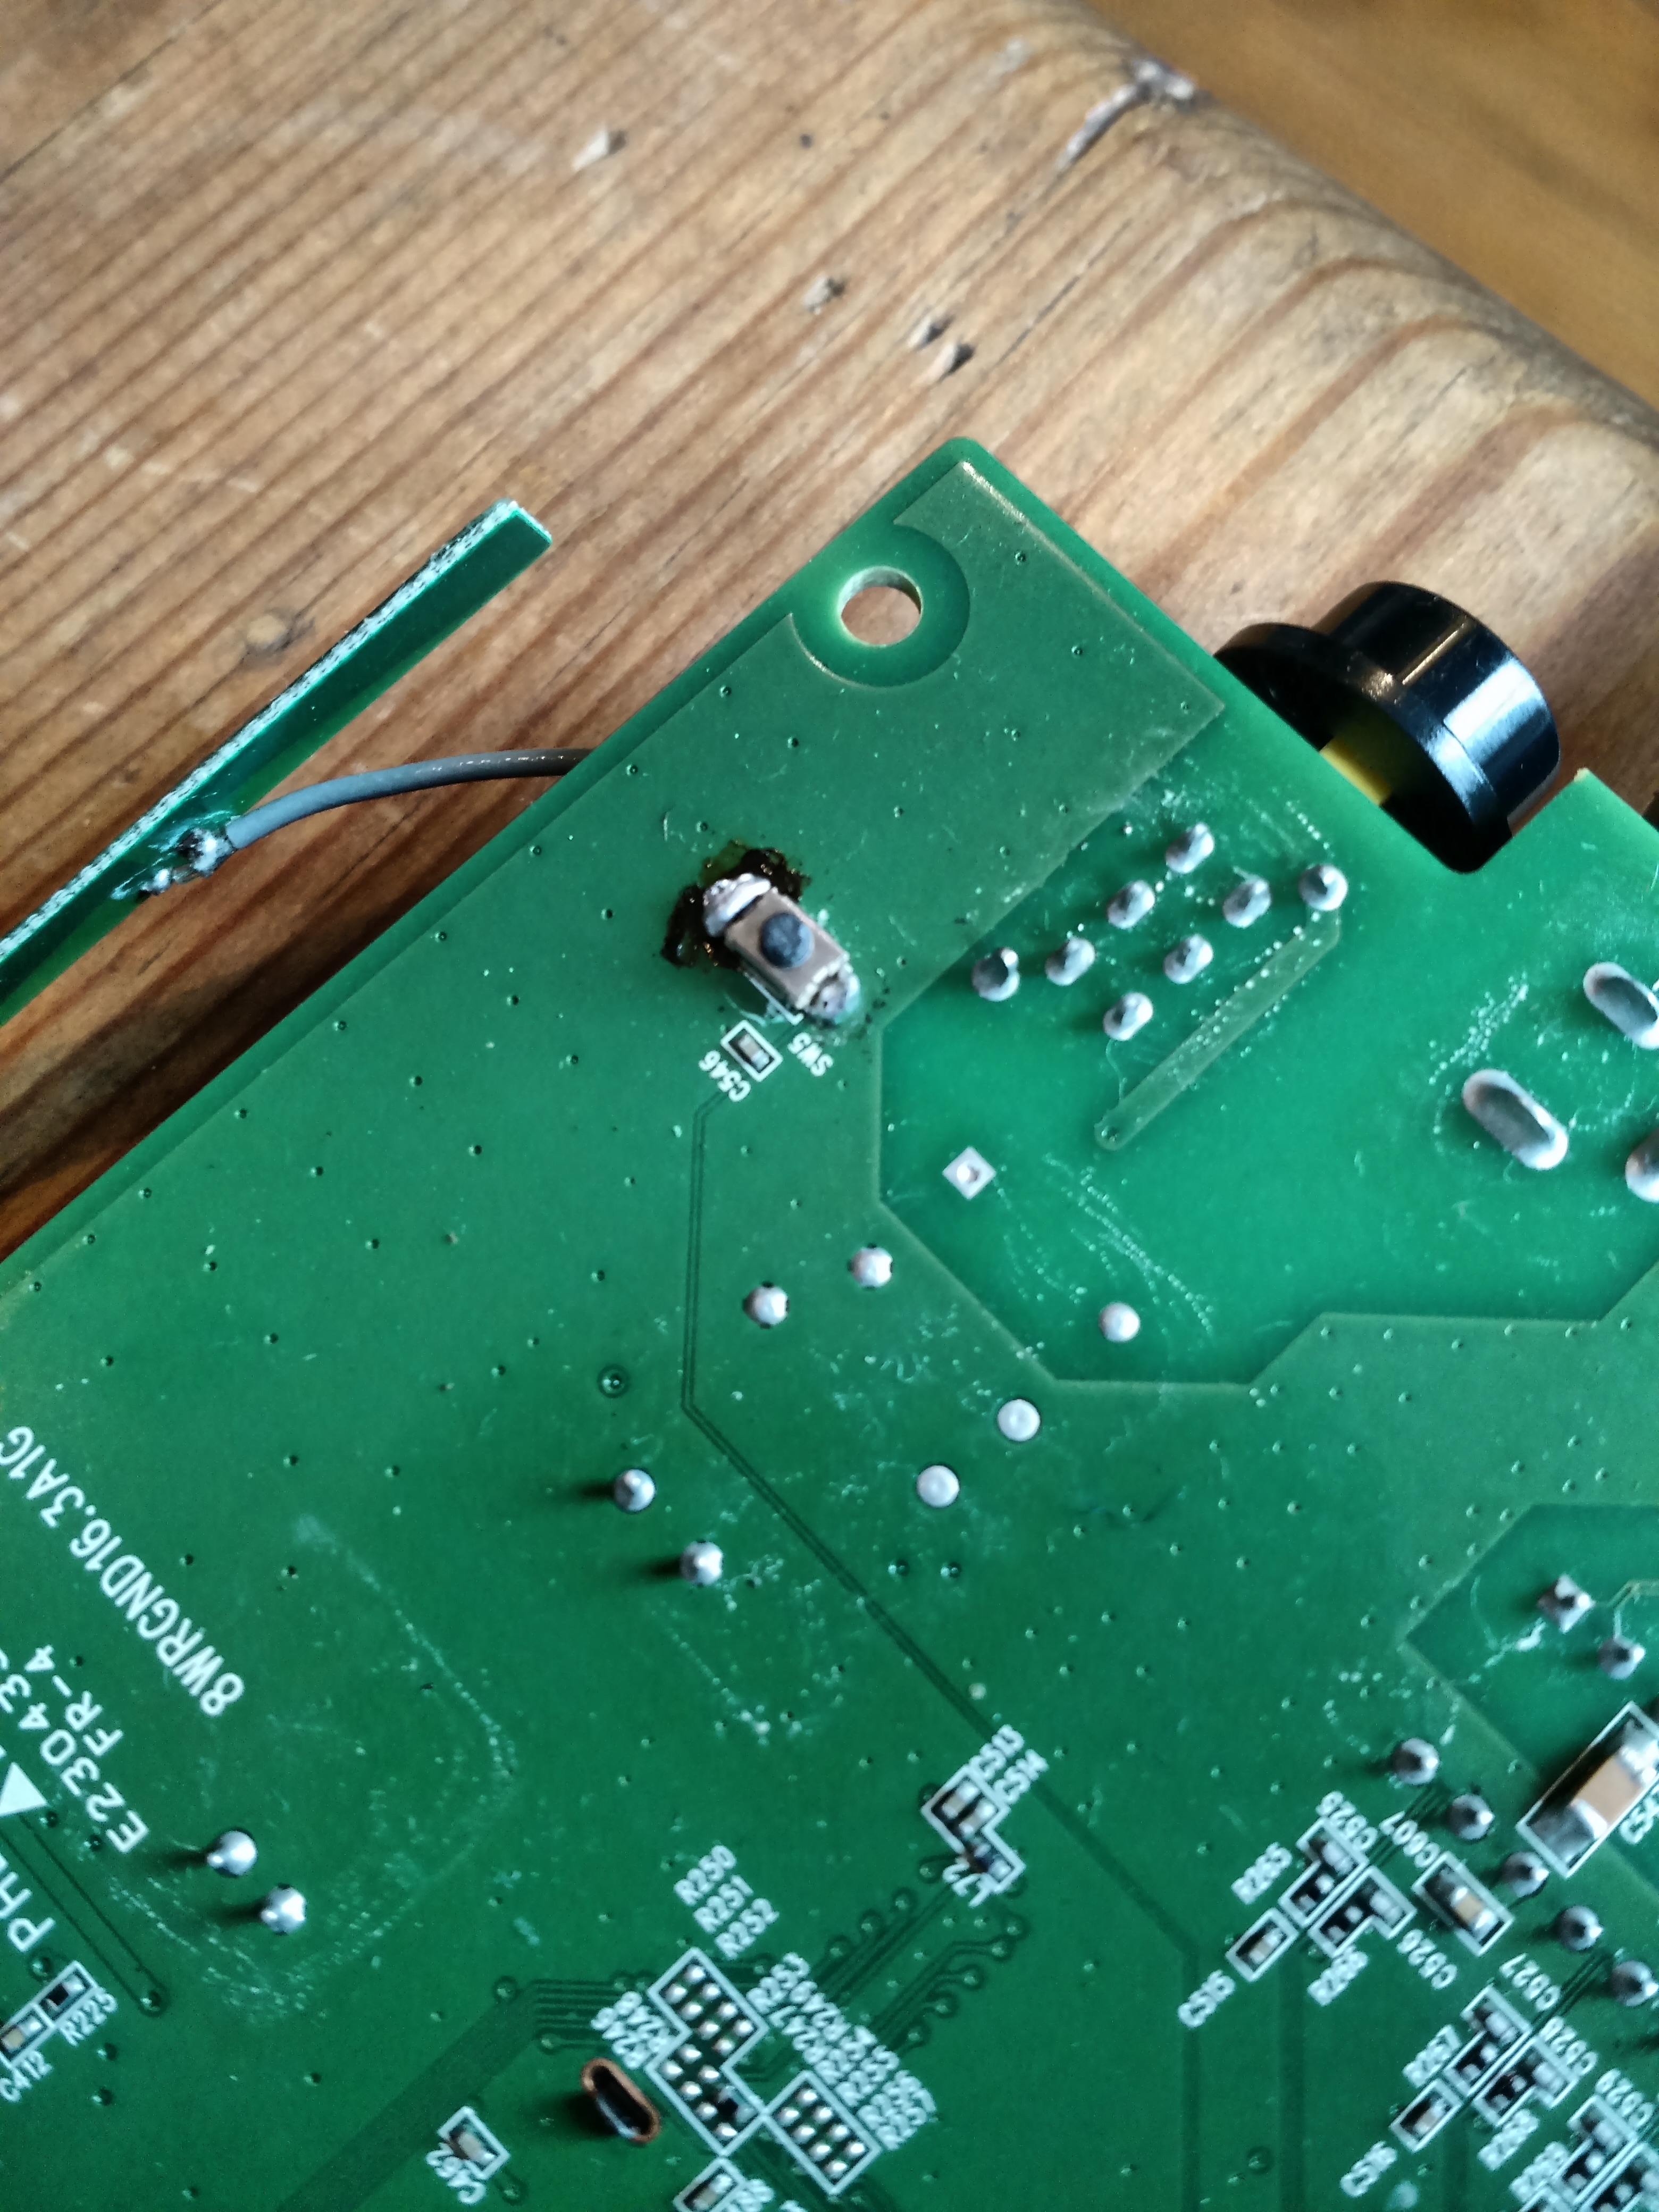
WD MyNet n600 resolder of the reset button that fell off

