Difference between revisions of "Mesh/Home and extender nodes"
(→Extender nodes: Supported hardware) |
Tunabananas (talk | contribs) m |
||
| (8 intermediate revisions by 4 users not shown) | |||
| Line 9: | Line 9: | ||
= Home nodes = | = Home nodes = | ||
Every node operator has a home node. The home node does everything you need for the mesh. It must be kept indoors since home nodes don't like rain or sun. Each home node has two wifi radios and two antennas so they can talk to other mesh nodes on both the 2.4 and 5 | Every node operator has a home node. The home node is a wifi router that does everything you need for the mesh. It must be kept indoors since home nodes don't like rain or sun. Each home node has two wifi radios and two antennas so they can talk to other mesh nodes on both the 2.4 and 5 gigahertz frequencies. Home nodes also have one wired network port for connecting to your existing internet connection (if you have one), two wired network ports to connect to any of your computers that don't have wifi and two wired network ports for connecting extender nodes (see next section). | ||
== Supported Hardware == | == Supported Hardware == | ||
| Line 19: | Line 19: | ||
* [https://wiki.openwrt.org/toh/wd/n600 Western Digital MyNet N600] | * [https://wiki.openwrt.org/toh/wd/n600 Western Digital MyNet N600] | ||
* [https://wiki.openwrt.org/toh/wd/n750 Western Digital MyNet N750] | * [https://wiki.openwrt.org/toh/wd/n750 Western Digital MyNet N750] | ||
All of the supported hardware is currently 802.11n but OpenWRT support was recently added for the 802.11ac MediaTek MT76x2 chipsets. We're currently evaluating [[Mesh/802.11ac devices|these 802.11ac devices]] for use as home nodes. As soon as there is support for the VLAN switch functionality on MediaTek chipsets then we should be able to fully support these routers. | |||
== Setup == | == Setup == | ||
| Line 32: | Line 34: | ||
=== Admin Access === | === Admin Access === | ||
Administrative tasks can be done with the web ui. You must be connected to the router via the "private" wifi signal/ssid. When connected over the private network, you can visit http:// | Administrative tasks can be done with the web ui. You must be connected to the router via the "private" wifi signal/ssid. When connected over the private network, you can visit http://admin.peoplesopen.net or http://172.30.0.1 | ||
In that web ui you can change the amount of bandwidth you'd like to share, the private ssid and wpa passwords, and the admin password. | You can log into this interface using 'admin' as the username, paired with the admin password used when the node was configured via [https://github.com/sudomesh/makenode makenode] | ||
In that web ui you can change the amount of bandwidth you'd like to share, the private ssid and wpa passwords, and the admin password. | |||
=== Root Login === | === Root Login === | ||
| Line 41: | Line 45: | ||
=== Ethernet Ports === | === Ethernet Ports === | ||
Home nodes are being configured with 1 WAN (internet port), 1 private network port, 1 "peoplesopen.net" port, and 2 "extender node" ports. | |||
The WAN port will be labeled "internet" and will be a different color than the rest. If you have a home internet connection that you'd like to share, connect this port to your upstream router or cable box from your ISP. | The WAN port will be labeled "internet" and will be a different color than the rest. If you have a home internet connection that you'd like to share, connect this port to your upstream router or cable box from your ISP. | ||
| Line 57: | Line 61: | ||
To tell you the truth, each extender node isn't really just an antenna: They each have their own computers and wifi radios so they can talk on different wifi channels at the same time as your home node without causing interference. | To tell you the truth, each extender node isn't really just an antenna: They each have their own computers and wifi radios so they can talk on different wifi channels at the same time as your home node without causing interference. | ||
The extender nodes that we | The extender nodes we explicitly support will extend [[#Wifi_Signals.2FSSIDs|all three of the wifi networks]] emitted by the home node (actually we're still working on the ability to extend the private network but it should be there soon). These extender nodes need to be flashed with our extender node firmware and automatically configure themselves correctly when plugged into a home node. | ||
The extender nodes that we explicitly support (referred to as smart extender nodes) are: | |||
* [https://wiki.openwrt.org/toh/ubiquiti/nanostationm5 Ubiquiti Nanostation M5] | * [https://wiki.openwrt.org/toh/ubiquiti/nanostationm5 Ubiquiti Nanostation M5] | ||
* [https://wiki.openwrt.org/toh/ubiquiti/nanostationm2 Ubiquiti Nanostation M2] | * [https://wiki.openwrt.org/toh/ubiquiti/nanostationm2 Ubiquiti Nanostation M2] | ||
| Line 66: | Line 73: | ||
* [https://wiki.openwrt.org/toh/ubiquiti/picostationm2 Ubiquiti Picostation M2] | * [https://wiki.openwrt.org/toh/ubiquiti/picostationm2 Ubiquiti Picostation M2] | ||
* [https://wiki.openwrt.org/toh/ubiquiti/bullet Ubiquiti Bullet M2 and M5] | * [https://wiki.openwrt.org/toh/ubiquiti/bullet Ubiquiti Bullet M2 and M5] | ||
In addition we are working to add support for using any normal wifi router as an extender node without reflashing but using this method you will only be able to extend a single one of the wifi networks per extender node and the extender node will have to be manually configured. We refer to these as dumb extenders. This is useful if you want to use unsupported hardware such as the Ubiquiti Nanobeam. | |||
[[Category:Mesh]] | |||
Latest revision as of 20:20, 27 June 2018
There are two types of nodes in the mesh:

Home nodes
Every node operator has a home node. The home node is a wifi router that does everything you need for the mesh. It must be kept indoors since home nodes don't like rain or sun. Each home node has two wifi radios and two antennas so they can talk to other mesh nodes on both the 2.4 and 5 gigahertz frequencies. Home nodes also have one wired network port for connecting to your existing internet connection (if you have one), two wired network ports to connect to any of your computers that don't have wifi and two wired network ports for connecting extender nodes (see next section).
Supported Hardware
At the moment, we are supporting the following routers for home nodes:
- TP-Link WDR3500
- TP-Link WDR3600
- TP-Link WDR4300
- Western Digital MyNet N600
- Western Digital MyNet N750
All of the supported hardware is currently 802.11n but OpenWRT support was recently added for the 802.11ac MediaTek MT76x2 chipsets. We're currently evaluating these 802.11ac devices for use as home nodes. As soon as there is support for the VLAN switch functionality on MediaTek chipsets then we should be able to fully support these routers.
Setup
Instructions for flashing and configuring home nodes are at our walkthrough page.
Info
Wifi Signals/SSIDs
Home nodes broadcast 3 SSIDs (these are the wifi names that you can connect to):
- `peoplesopen.net` - the public network that anyone can connect to and that connects to the rest of the mesh
- `pplsopen.net-node2node` - the "adhoc" network that the node will use to connect to other routers
- (Your private SSID Name) - you can set a private ssid name and a wpa2 password to connect to the node. When you're connected to this network, you won't be connected to the rest of the mesh, and your traffic will not be routed through the mesh exit server. You can connect to this ssid to use the web admin to make basic config changes.
Admin Access
Administrative tasks can be done with the web ui. You must be connected to the router via the "private" wifi signal/ssid. When connected over the private network, you can visit http://admin.peoplesopen.net or http://172.30.0.1
You can log into this interface using 'admin' as the username, paired with the admin password used when the node was configured via makenode
In that web ui you can change the amount of bandwidth you'd like to share, the private ssid and wpa passwords, and the admin password.
Root Login
When the node is originally configured, it is set with a root password. If you want shell access to the device, you can use this password to login as root. It's sort of generally preferable that you use ssh keys, which are stored on the node in `/etc/dropbear/authorized_keys`. During alpha testing there will be three developer keys stored there so that our dev volunteers can access the devices for maintenance and diagnostics. If you want to remove access, feel free to comment out those lines, but please keep in mind that this limits our effectiveness to troubleshoot and upgrade during this period.
Ethernet Ports
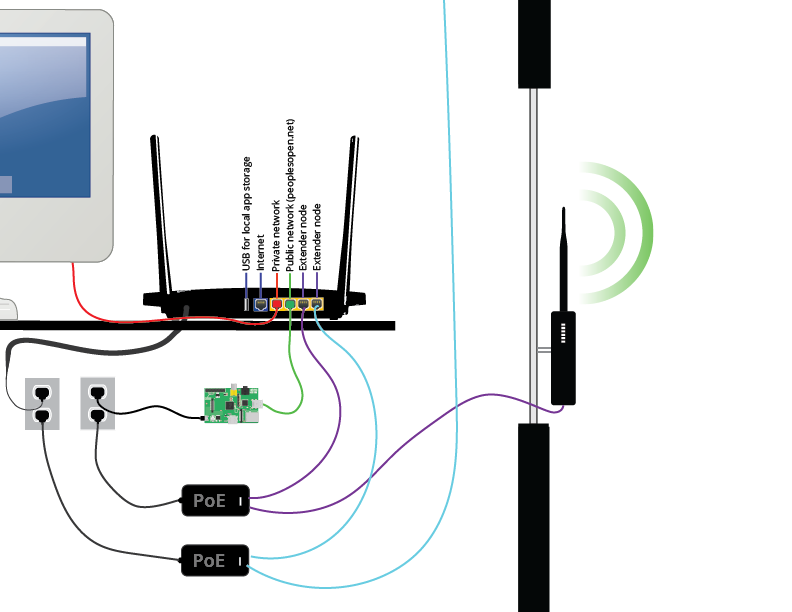
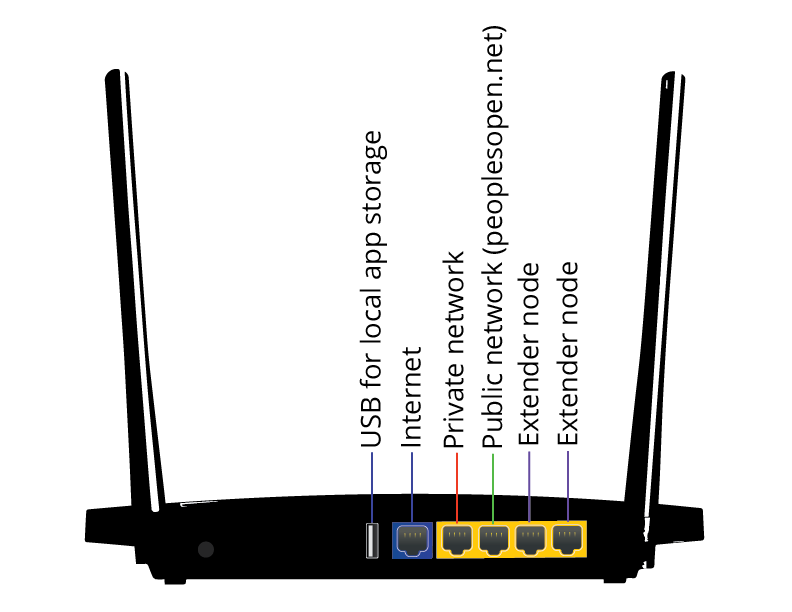
Home nodes are being configured with 1 WAN (internet port), 1 private network port, 1 "peoplesopen.net" port, and 2 "extender node" ports.
The WAN port will be labeled "internet" and will be a different color than the rest. If you have a home internet connection that you'd like to share, connect this port to your upstream router or cable box from your ISP.
The "peoplesopen.net" ports function as LAN ports on the network. They are assigned a DHCP lease/ip within the peoplesopen.net subnet and can access (and be accessed by) all of the other computers on the mesh. They are functionally equivalent to connecting to the "peoplesopen.net" ssid.
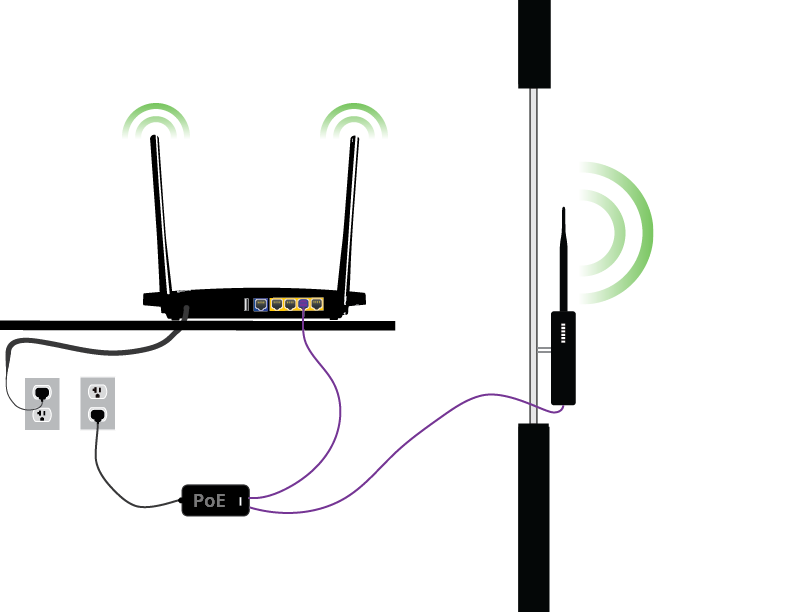
The "extender node" ports are for connecting extender nodes, whose functions are detailed below. The home node will be running a `notdhcpserver` daemon listening on those ports, so if you connect an extender node to them, the two devices **should** automatically negotiate the correct ip address and additional parameters for the extender node.
Unfortunately, the different hardwares have different numbering for the non "internet" ports, so which ports are for extenders and which are "peoplesopen.net lan" ports will not always be the same from device to device. It's fairly easy to test, though. Simply connect a laptop or other computer to one. If it receives a DHCP lease/ip address within the mesh subnet (100.64.0.0/10), then it is a "peoplesopen.net" port. If not, then it is an extender port.
Extender nodes
Extender nodes are optional add-ons to your home node. They plug into your home node with a cable and act as a sort of extra antenna that extends the signal of your home node to reach mesh nodes that are further away. Extender nodes come in different shapes and sizes. You can get extender nodes that look like little parabolic dishes and these are suitable for mounting on your roof and making connections to other nodes several miles away! Or you can get ones that are flat and tall that are good for extending the signal out your window and to your close neighbours or maybe to a nearby park. Most extender nodes can be mounted outside and only need one cable that carries both data and power.
To tell you the truth, each extender node isn't really just an antenna: They each have their own computers and wifi radios so they can talk on different wifi channels at the same time as your home node without causing interference.
The extender nodes we explicitly support will extend all three of the wifi networks emitted by the home node (actually we're still working on the ability to extend the private network but it should be there soon). These extender nodes need to be flashed with our extender node firmware and automatically configure themselves correctly when plugged into a home node.
The extender nodes that we explicitly support (referred to as smart extender nodes) are:
- Ubiquiti Nanostation M5
- Ubiquiti Nanostation M2
- Ubiquiti Picostation M2
- Ubiquiti Nanobeam M2 and M5
- Ubiquiti Picostation M2
- Ubiquiti Picostation 2
- Ubiquiti Picostation M2
- Ubiquiti Bullet M2 and M5
In addition we are working to add support for using any normal wifi router as an extender node without reflashing but using this method you will only be able to extend a single one of the wifi networks per extender node and the extender node will have to be manually configured. We refer to these as dumb extenders. This is useful if you want to use unsupported hardware such as the Ubiquiti Nanobeam.

