Difference between revisions of "Big red laser cutter"
(Update, put several sets of images in galleries) |
|||
| (23 intermediate revisions by 4 users not shown) | |||
| Line 1: | Line 1: | ||
== General Info == | == General Info == | ||
=== Introduction === | |||
The big red laser cutter is a no-name model using a [https://ruidacontroller.com/wp-content/uploads/2021/10/RDC644XGS-Control-System-V1.3-Manual.pdf Ruida 644XG control board]. Its bed dimensions are about 730mm wide by 500mm deep. It looks like a 100 W CO<sub>2</sub> laser. | |||
The | The Melbourne Makerspace has the same laser and have a [https://wiki.melbournemakerspace.org/Laser%20Cutter nicely written wiki page on it]. | ||
=== Maintenance === | |||
''To be performed '''monthly''''' | |||
* Clean [[#Lens & Mirrors|lens & mirrors]] | |||
As needed | |||
* Clean [[#Exhaust Fan|exhaust fan]] | |||
* Clean cutaway collection area under bed | |||
=== Dangers === | |||
[[File:Caution-danger-sign.jpg|frameless|right]] | |||
''Be aware:'' lasers are very dangerous! Review these [https://ehs.mit.edu/workplace-safety-program/laser-cutter-safety/ safety guidelines], and carry an appropriate level of fear of the laser at all times. Hazards include: | |||
'''Fire hazard''' | |||
Lasers create high heat, and can cause materials to catch on fire. Certain materials and types of designs (i.e very dense/small objects) are more prone to fire. | |||
To minimize fire risk, remember to... | |||
# Never leave laser unattended. Be prepared to respond promptly in case of fire. Familiarize yourself with where the fire extinguisher and water spray bottle are before using. You should never see a prolonged flame while using the laser cutter. | |||
# If you see a candle sized flame for more than 3 seconds while cutting, stop the laser, check/adjust bed height, power/speed settings, or use a different material. | |||
'''Respiratory Hazard''' | |||
Laser cutters create fumes and small particulates. | |||
To minimize respiratory hazards, remember to... | |||
# Only cut and engrave [[LASER SAFE material]]. Some materials can emit toxic fumes when laser cut, and should never be used in the laser cutter! | |||
# Always have the ventilation fan on while using the laser cutter, and for a few minutes after you are done. Even laser safe materials aren't good to breathe in. | |||
# Check in with other people in the room before using the laser cutter to see if they are sensitive to fumes. Be accommodating! | |||
'''Laser Hazard''' | |||
To minimize laser exposure hazards, remember to.. | |||
# Never look directly at the laser beam. While wearing ''laser eye protection'', you may look at the point that the laser is cutting your material. However, you should NEVER look directly into a laser beam, even if wearing safety goggles. | |||
# Never run the laser cutter while the lid is open. | |||
'''"Help, I tripped the breaker!"''' | |||
This is how to reset the [[breaker]] that the laser (and sewing/3dprinting/hardware corner) is on. | |||
== Known Issues == | |||
Firstly, this thing is '''''great''''' and we love it, flaws and all! Here are some quirks that should be solved or worked around. | |||
=== Crooked Bed === | |||
[[File:Crooked cut bed.png|thumb|right|alt=Graphic depicting cut bed and laser range, cut bed is crooked, rotated slightly anti-clockwise|Crooked bed]] | |||
The cut bed and guides are rotated slightly anti-clockwise, this means anything you align to the guide will be off a bit of what you may expect. For example, a straight horizontal line engraved on a piece aligned to the left edge guide will appear at a downward angle from left to right, on the piece. This also means if you start at (0, 0) and cut straight down ''you'll cut into the the guide'', oh no! | |||
:'''Work around:''' There is a simple jig that's been cut and lives on the bed, it's a brown piece of MDF. If you want a square cut using the jig, place your piece in the top left corner against the jig and position the laser at x=21.9, y=0 (two presses of the right arrow on the controller). | |||
=== Non-Level Bed === | |||
There appears to be a slight slope starting at (0, 0) from left to right the bed rises about 1mm over 10cm. This warrants further investigation, might be only near top left of cut bed, doesn't appear/shouldn't have dramatic affect on cuts. | |||
'' | === Laser Pointer === | ||
Not to be confused with the powerful laser used to engrave and cut, this is a helpful little laser that points to ''where'' a cut will be made. It appears not to work at the moment. | |||
== Operation Instructions == | == Operation Instructions == | ||
# First turn on the laser cutter control switch, located on the right side of the machine. | |||
<gallery mode="packed" heights="200"> | |||
File:Laser_control_switch.jpg|Showing laser control switch on | |||
</gallery> | |||
=== Preparing Material === | === Preparing Material === | ||
# Put LASER SAFE | # Put [[LASER SAFE material]] on the bed | ||
# | # Use the control pad arrow keys to move the laser head above your material. We want it above the material to properly set the bed height | ||
# | # Once laser head above material, use the knob inside the laser cutter to move the bed up and down. The correct height is about 3/4" '''(UPDATE: use 17mm block)''' above your material. You can use the "laser focus height" tool as reference. | ||
<gallery mode="packed" heights="200"> | |||
File:Laser_bed_z_adjust.jpg|Showing where Z adjust height is for laser | |||
File:Laser_bed_correct_bed_height.jpg|Showing correct bed height for laser | |||
File:Laser_bed_correct_bed_height_with_tool.jpg|Showing correct bed height for laser with tool | |||
</gallery> | |||
=== Turning on the laser === | === Turning on the laser and exhaust === | ||
# Turn on the | # Turn on the exhaust fan by switching on the power strip on top of the laser cutter. You should hear the exhaust fan turn on. Also, switch on the air purifier on the desk. | ||
# Enable the laser | # Enable the laser by turning on the laser switch on the left side of the machine, and turning the key on the front of the machine. | ||
<gallery mode="packed" heights="200"> | |||
File:Laser_exhaust_fan.jpg|Exhaust fan for laser cutter | |||
File:Laser_switch.jpg|Showing laser switch on | |||
File:Laser_key_switch.jpg|Showing laser key switch on (turn clockwise) | |||
</gallery> | |||
=== Preparing the file === | === Preparing the file === | ||
[[File:Lightburn layer tips.png|thumb|LightBurn layer settings]] | |||
The following steps should be done on the computer near the laser cutter, which has LightBurn installed on it. | |||
# Open LightBurn on computer next to the laser cutter | |||
# Import a vector file (svg, dxf, pdf, etc.), raster image, or create a design in LightBurn. | |||
# Set the color of items to define how you want them cut or engraved, then double click the colors in the pane on the right to set the laser speed, power, and other features associated with that color. Black can be used to cut and red to etch, for instance. Use this chart to get a ballpark reference for speed and power settings: '''[[Big red laser cutter settings]]'''. It is recommended to do a "test cut" before cutting out a large file to be sure your speed and power settings are good. | |||
# Select "absolute coordinates" to define the placement relative to the bed. Select "user origin" to set the placement on the bed manually. The device should be set to ttyUSB0, Ruida664GX. | |||
# Once happy with design, click “Send” | |||
# Enter a name (or just use default to override) and press enter. | |||
# Wait for the file to send. | |||
=== Running the laser === | === Running the laser === | ||
# | The following steps should be done using the control panel on the laser cutter itself. | ||
# On the laser cutter control panel, press "File" to see available files. | |||
# Scroll and press “Enter” to select a file. | # Scroll and press “Enter” to select a file. | ||
# Set the origin if necessary. | # Set the origin if necessary. | ||
# Press | # Press “Frame" to confirm placement. When you press this, the laser cutter head will trace around the max coordinates, to show you where your design will be cut. | ||
# | # If the frame is correct press “Start”, and the laser will run. | ||
=== Having Trouble Setting the Origin? === | === Having Trouble Setting the Origin? === | ||
If you are using | If you are using LightBurn to compose your project, be sure to use the setting "Current Position".<br> | ||
Otherwise, | Otherwise, LightBurn may override any origin you set at the laser cutter. | ||
Setting the origin on the laser cutter is easy.<br> | Setting the origin on the laser cutter is easy.<br> | ||
| Line 52: | Line 117: | ||
You may find that moving the "head" is much easier than moving the material placed on the bed! | You may find that moving the "head" is much easier than moving the material placed on the bed! | ||
== | == Cleaning == | ||
=== Lens & Mirrors === | |||
'''''Very carefully.''''' Clean the lens and mirrors monthly. | |||
<!-- Add instructions --> | |||
=== Exhaust Fan === | |||
If the exhaust fan is not working well, it might need to be cleaned. | |||
To clean, detach the fan and base from the laser cutter. The green area circled in the below picture is where you need to get access, the '''intake'''. | |||
<!-- gallery not respecting height max, removing png solves issue --> | |||
<gallery mode="packed" heights="200"> | |||
File:Laser_fan_detach.jpg|Pull the milk crates away from the laser cutter, disconnecting the '''intake''' from the blue ducting | |||
File:Laser_fan_detached.png|This is what the fan looks like with '''intake''' oriented towards you | |||
File:Laser_fan_dirty.jpg|Dirty exhaust fan '''intake''', ''an N95 mask is recommended'', use a vacuum and toothbrush/wire brush to clean. | |||
File:Laser_fan_clean.jpg|Clean exhaust fan '''intake''' | |||
</gallery> | |||
== Other software == | |||
As mentioned, RDWorks can also be used. We haven't tried it yet but it seems it's a free download [https://www.thunderlaser.com/laser-download from here]. | As mentioned, RDWorks can also be used. We haven't tried it yet but it seems it's a free download [https://www.thunderlaser.com/laser-download from here]. | ||
| Line 60: | Line 141: | ||
[https://spaz.org/~jake/sudoroom/Big_red_laser_cutter/ <u>The above software has also been downloaded and stored here</u>] | [https://spaz.org/~jake/sudoroom/Big_red_laser_cutter/ <u>The above software has also been downloaded and stored here</u>] | ||
It was setup with an IP address of 100.64.64.69 (by pressing buttons through the menu) but it had no ports open and then we just switched over to USB to the computer and it was working fine. The same software might work over ethernet but we didn't try. | |||
== Trying other things == | == Trying other things == | ||
| Line 67: | Line 148: | ||
I'm trying to install [https://laserweb.yurl.ch/|LaserWeb]. | I'm trying to install [https://laserweb.yurl.ch/|LaserWeb]. | ||
I ran the commands here : https://laserweb.yurl.ch/documentation/installation/36-install-raspberry-pi. But the server gave an error when started: | I ran the commands here: https://laserweb.yurl.ch/documentation/installation/36-install-raspberry-pi. But the server gave an error when started: | ||
{| class="wikitable mw-collapsible mw-collapsed" | |||
|+ class="nowrap" | Error | |||
| | |||
<nowiki> | |||
Server binding to all local IP addresses on port: 8000 | Server binding to all local IP addresses on port: 8000 | ||
internal/modules/cjs/loader.js:818 | internal/modules/cjs/loader.js:818 | ||
| Line 89: | Line 173: | ||
code: 'MODULE_NOT_FOUND', | code: 'MODULE_NOT_FOUND', | ||
requireStack: [ '/home/laser/Programs/lw.comm-server/server.js' ] | requireStack: [ '/home/laser/Programs/lw.comm-server/server.js' ] | ||
} | }</nowiki> | ||
|} | |||
== Stuff made on the big red laser cutter == | == Stuff made on the big red laser cutter == | ||
* I cut some 1/4 clear plastic suspected to be acrylic. Used .5mm/sec 100%/40% power. It cut all the way through but the edge was rough. | * I cut some 1/4" clear plastic suspected to be acrylic. Used 0.5mm/sec 100% / 40% power. It cut all the way through but the edge was rough. | ||
== Stuff seen around the space == | == Stuff seen around the space == | ||
<!-- What's this section for? --> | |||
== | == Ventilation ducting == | ||
=== | === History === | ||
A plastic adapter was 3D printed to connect the 6" outlet of the exhaust fan to the 8" flexible duct leading to the roof hole: | |||
< | {| class="wikitable mw-collapsible mw-collapsed" | ||
|+ class="nowrap" | SCAD instructions | |||
| | |||
<nowiki> | |||
laserduct.scad | |||
THICKNESS=1.5*25.4; | THICKNESS=1.5*25.4; | ||
ID=5.75*25.4; | ID=5.75*25.4; | ||
| Line 132: | Line 204: | ||
translate([0,0,ID_LIP_THICK]) cylinder(d=ID, h=THICKNESS, $fn=100); | translate([0,0,ID_LIP_THICK]) cylinder(d=ID, h=THICKNESS, $fn=100); | ||
translate([0,0,-0.5]) cylinder(d=ID_LIP, h=THICKNESS, $fn=100); | translate([0,0,-0.5]) cylinder(d=ID_LIP, h=THICKNESS, $fn=100); | ||
} | } | ||
}</ | }</nowiki> | ||
|} | |||
Also the duct/roof interface was improved and a new stand was made for the extractor fan. Yay for milk crates! | |||
Also the duct/roof interface was improved and a new stand was made for the extractor fan. Yay for | |||
<gallery mode="packed" heights="200"> | |||
File:Laserduct.png|3D printing exhaust duct adapter | |||
File:Fan-holder.jpg|Inside | |||
File:new-vent-top.jpg|Outside | |||
</gallery> | |||
Revision as of 13:47, 26 April 2026
General Info
Introduction
The big red laser cutter is a no-name model using a Ruida 644XG control board. Its bed dimensions are about 730mm wide by 500mm deep. It looks like a 100 W CO2 laser.
The Melbourne Makerspace has the same laser and have a nicely written wiki page on it.
Maintenance
To be performed monthly
- Clean lens & mirrors
As needed
- Clean exhaust fan
- Clean cutaway collection area under bed
Dangers

Be aware: lasers are very dangerous! Review these safety guidelines, and carry an appropriate level of fear of the laser at all times. Hazards include:
Fire hazard
Lasers create high heat, and can cause materials to catch on fire. Certain materials and types of designs (i.e very dense/small objects) are more prone to fire.
To minimize fire risk, remember to...
- Never leave laser unattended. Be prepared to respond promptly in case of fire. Familiarize yourself with where the fire extinguisher and water spray bottle are before using. You should never see a prolonged flame while using the laser cutter.
- If you see a candle sized flame for more than 3 seconds while cutting, stop the laser, check/adjust bed height, power/speed settings, or use a different material.
Respiratory Hazard
Laser cutters create fumes and small particulates.
To minimize respiratory hazards, remember to...
- Only cut and engrave LASER SAFE material. Some materials can emit toxic fumes when laser cut, and should never be used in the laser cutter!
- Always have the ventilation fan on while using the laser cutter, and for a few minutes after you are done. Even laser safe materials aren't good to breathe in.
- Check in with other people in the room before using the laser cutter to see if they are sensitive to fumes. Be accommodating!
Laser Hazard
To minimize laser exposure hazards, remember to..
- Never look directly at the laser beam. While wearing laser eye protection, you may look at the point that the laser is cutting your material. However, you should NEVER look directly into a laser beam, even if wearing safety goggles.
- Never run the laser cutter while the lid is open.
"Help, I tripped the breaker!"
This is how to reset the breaker that the laser (and sewing/3dprinting/hardware corner) is on.
Known Issues
Firstly, this thing is great and we love it, flaws and all! Here are some quirks that should be solved or worked around.
Crooked Bed

The cut bed and guides are rotated slightly anti-clockwise, this means anything you align to the guide will be off a bit of what you may expect. For example, a straight horizontal line engraved on a piece aligned to the left edge guide will appear at a downward angle from left to right, on the piece. This also means if you start at (0, 0) and cut straight down you'll cut into the the guide, oh no!
- Work around: There is a simple jig that's been cut and lives on the bed, it's a brown piece of MDF. If you want a square cut using the jig, place your piece in the top left corner against the jig and position the laser at x=21.9, y=0 (two presses of the right arrow on the controller).
Non-Level Bed
There appears to be a slight slope starting at (0, 0) from left to right the bed rises about 1mm over 10cm. This warrants further investigation, might be only near top left of cut bed, doesn't appear/shouldn't have dramatic affect on cuts.
Laser Pointer
Not to be confused with the powerful laser used to engrave and cut, this is a helpful little laser that points to where a cut will be made. It appears not to work at the moment.
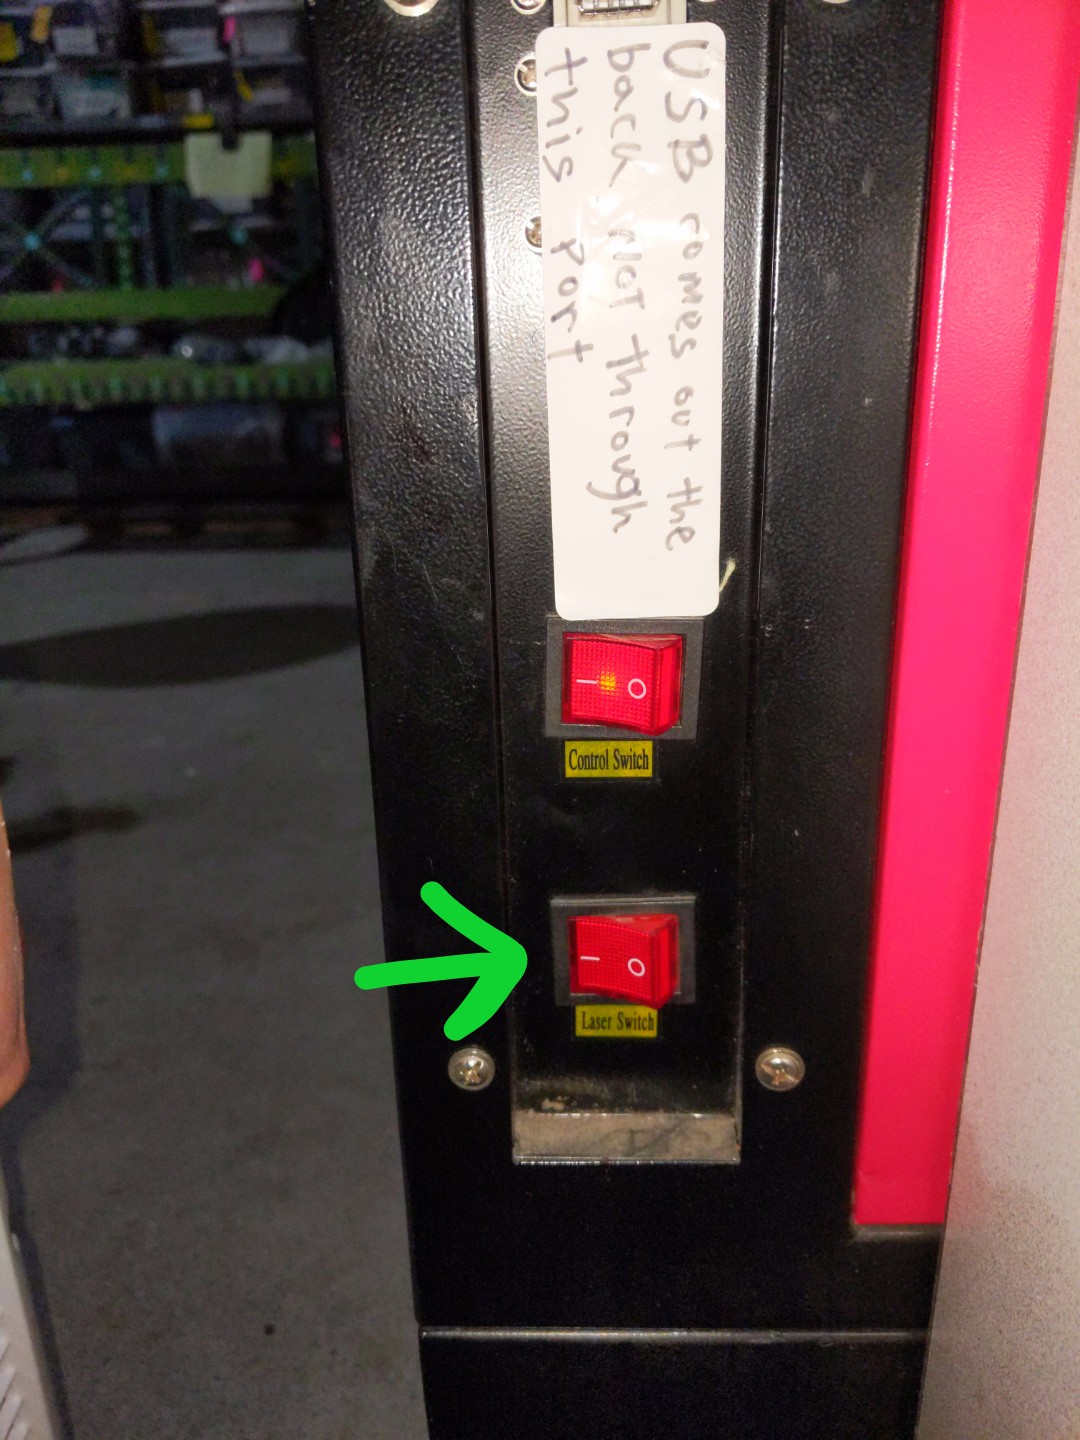
Operation Instructions
- First turn on the laser cutter control switch, located on the right side of the machine.
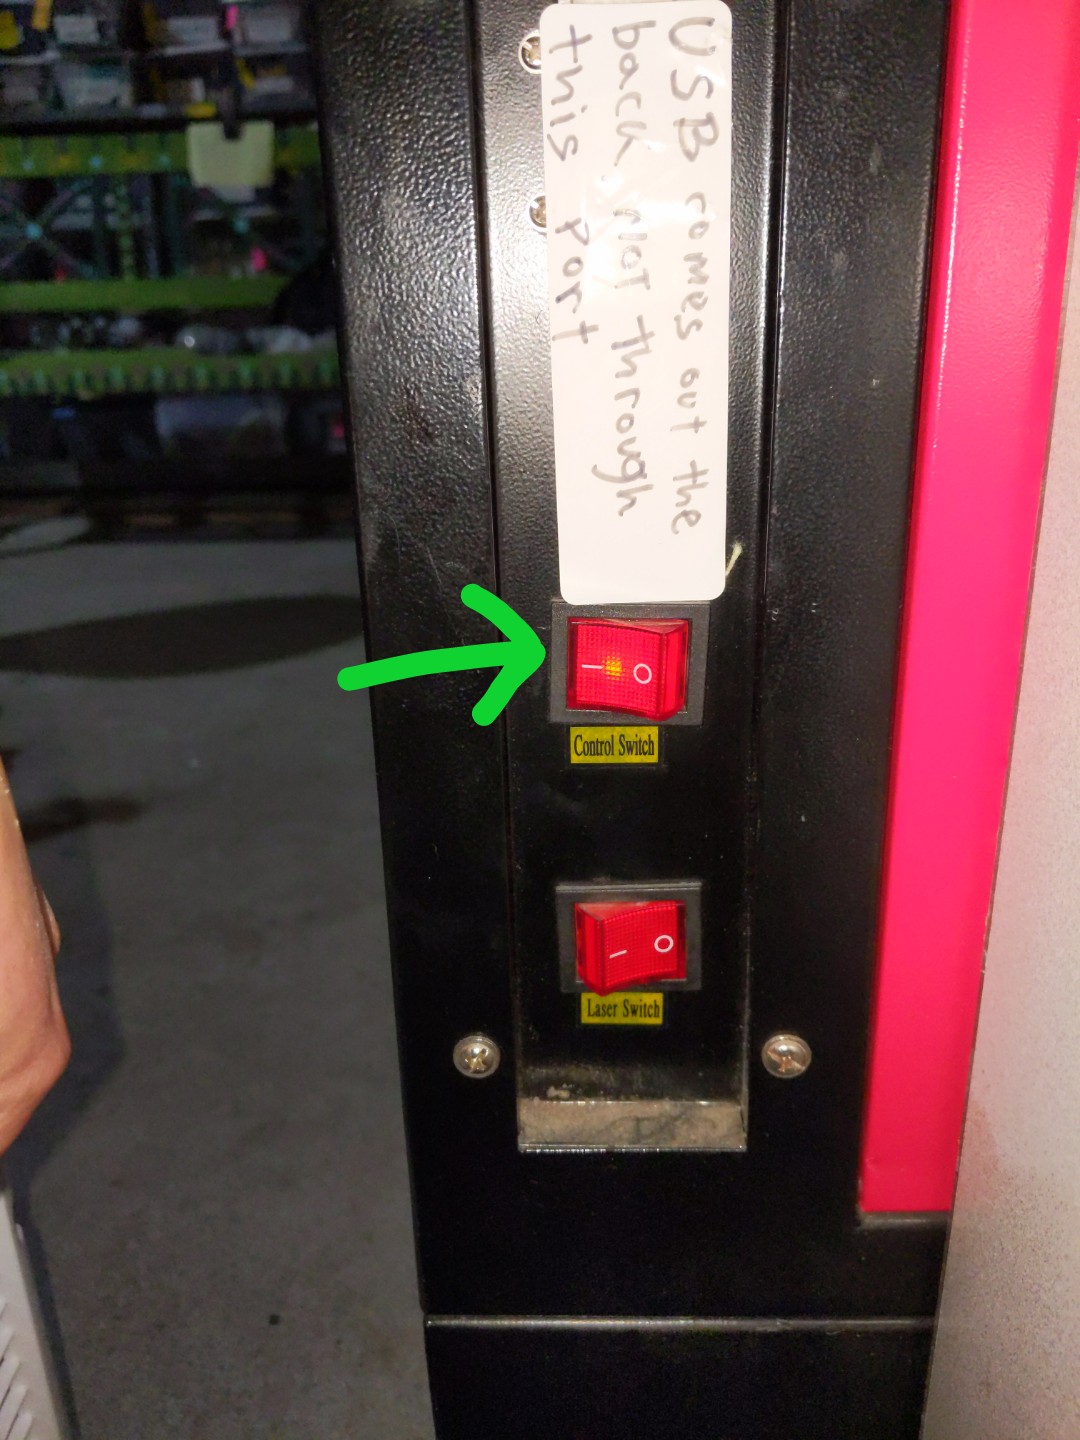
Showing laser control switch on

Preparing Material
- Put LASER SAFE material on the bed
- Use the control pad arrow keys to move the laser head above your material. We want it above the material to properly set the bed height
- Once laser head above material, use the knob inside the laser cutter to move the bed up and down. The correct height is about 3/4" (UPDATE: use 17mm block) above your material. You can use the "laser focus height" tool as reference.
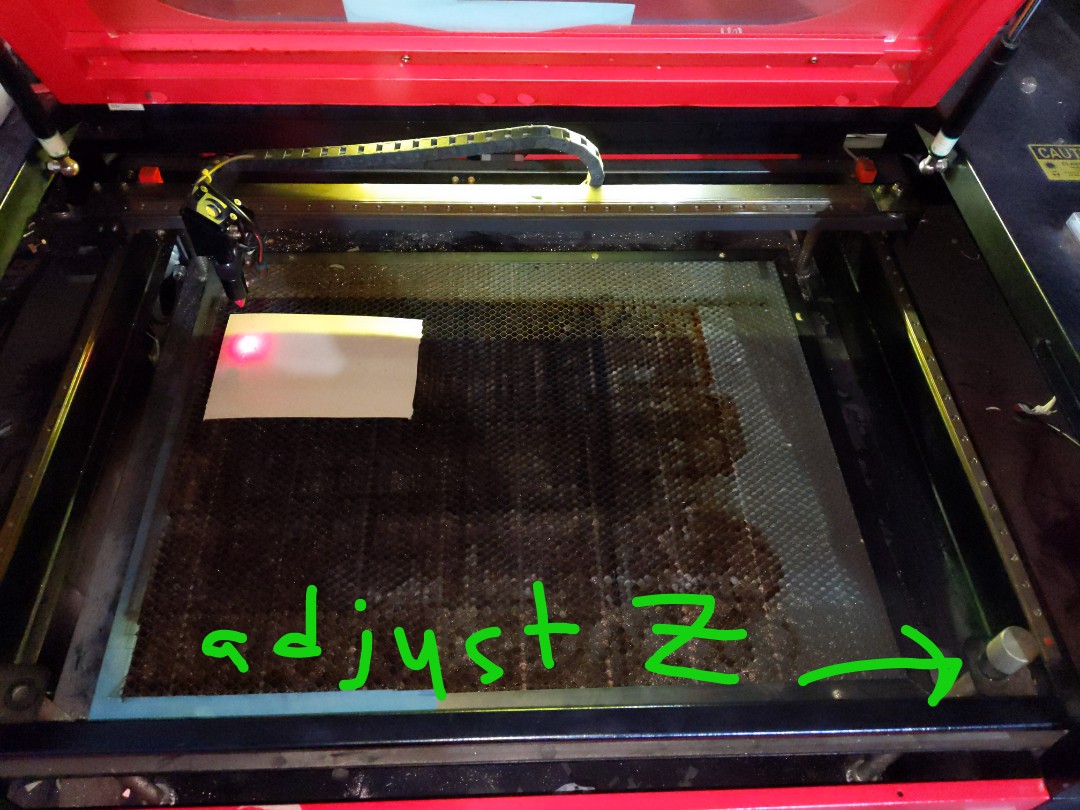
Showing where Z adjust height is for laser
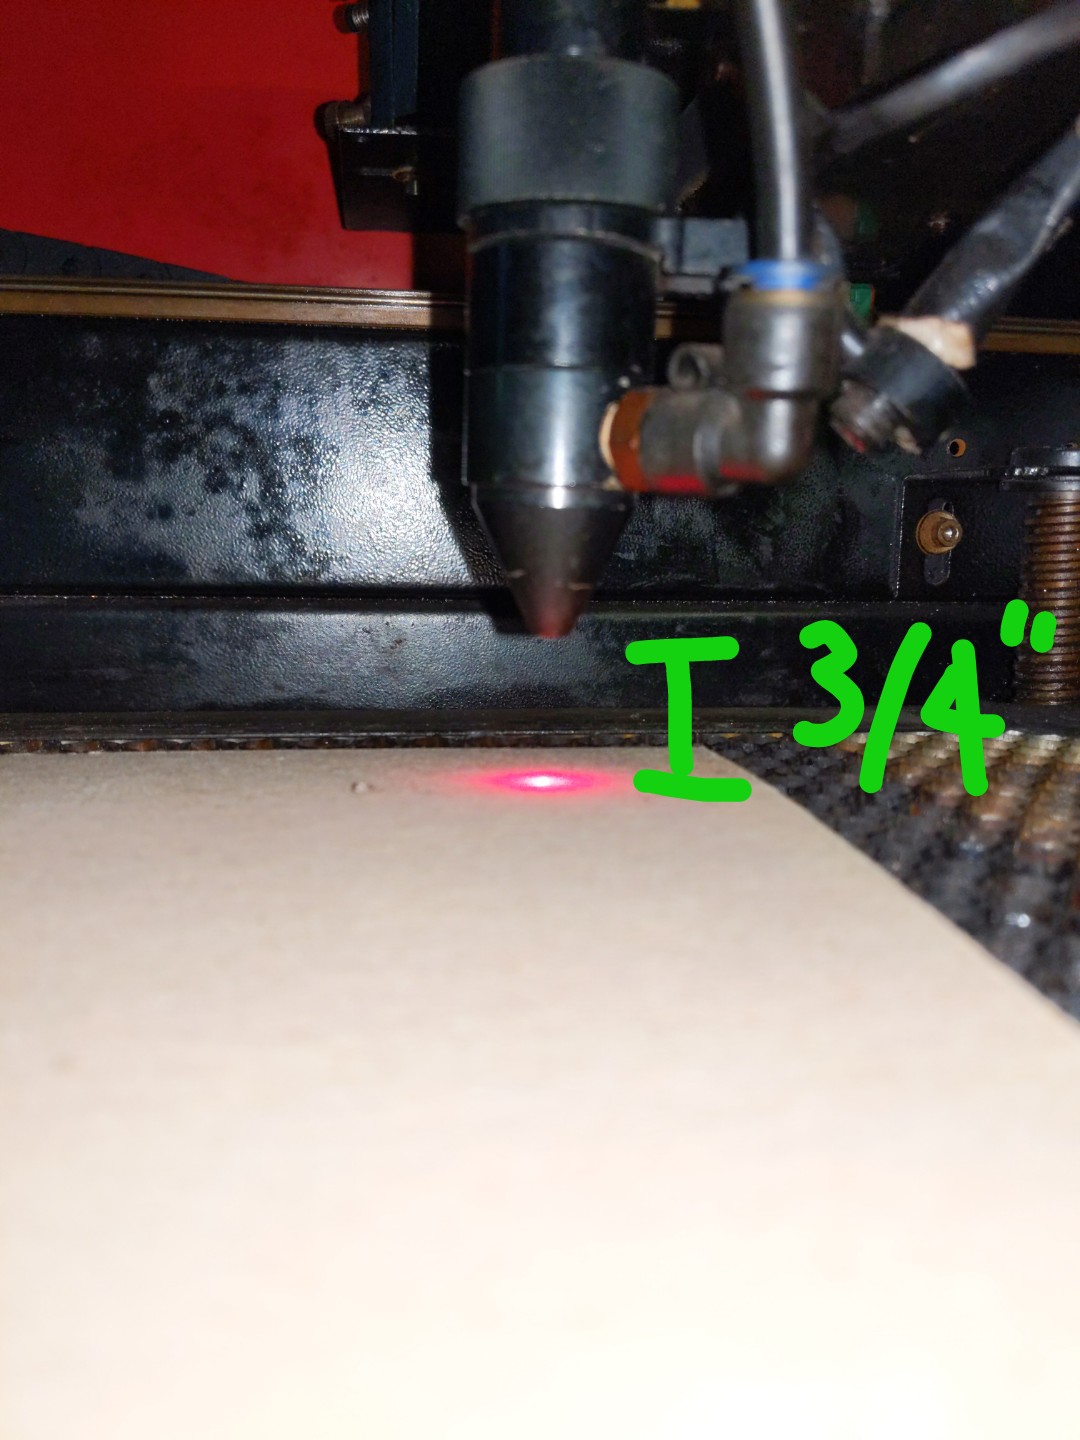
Showing correct bed height for laser
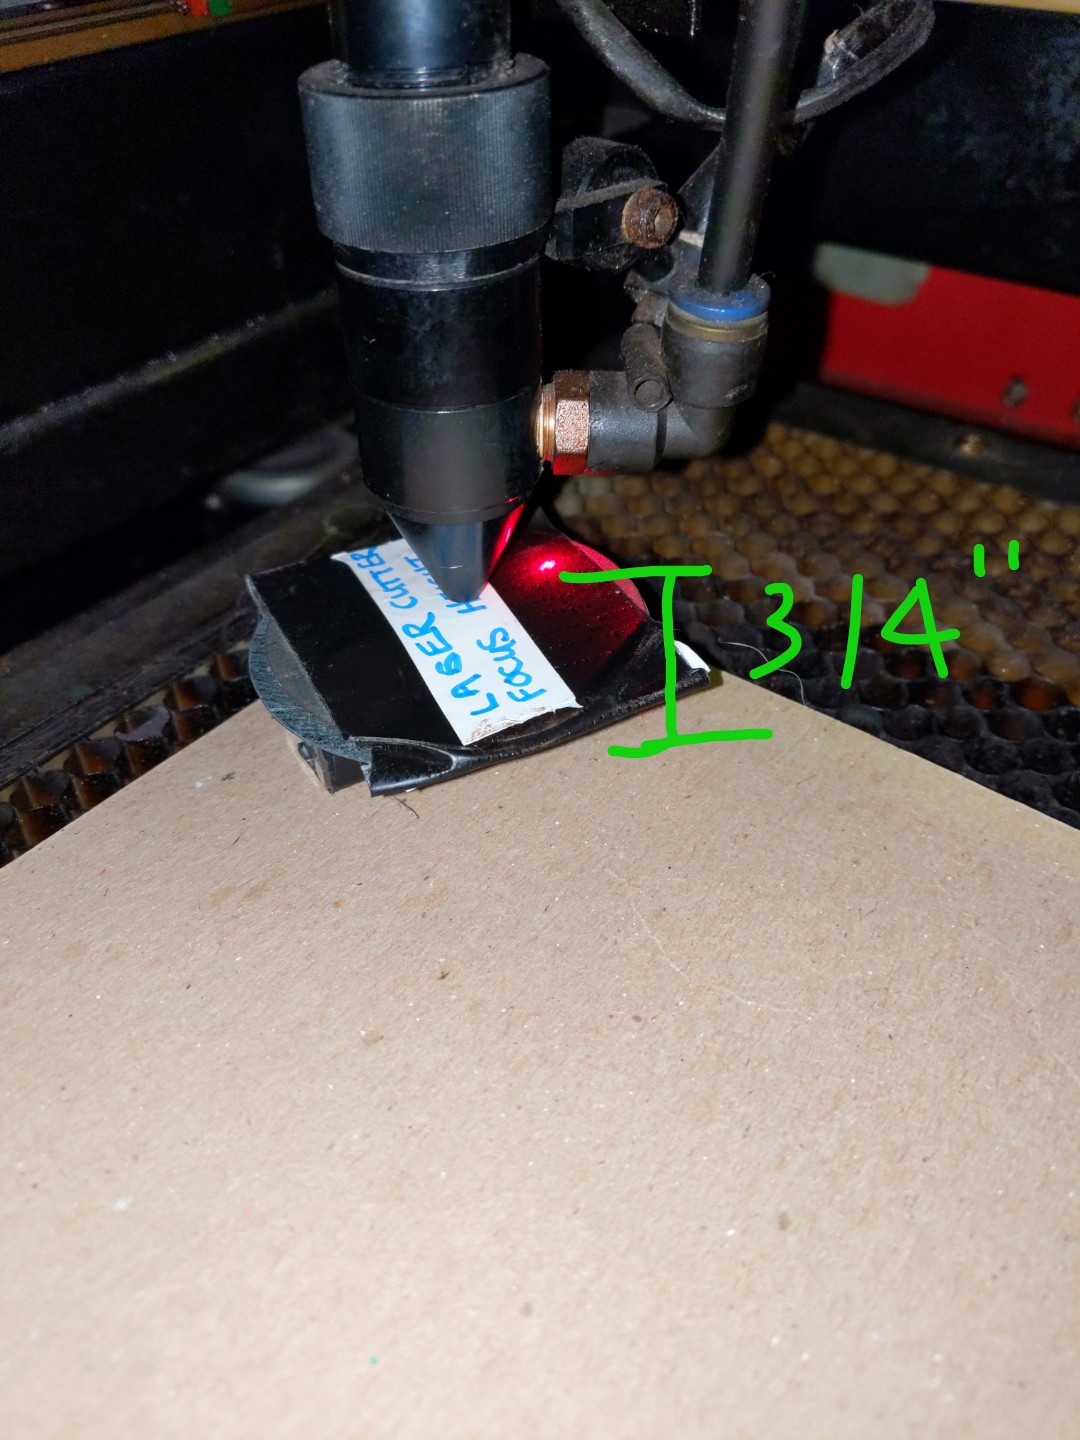
Showing correct bed height for laser with tool


Turning on the laser and exhaust
- Turn on the exhaust fan by switching on the power strip on top of the laser cutter. You should hear the exhaust fan turn on. Also, switch on the air purifier on the desk.
- Enable the laser by turning on the laser switch on the left side of the machine, and turning the key on the front of the machine.
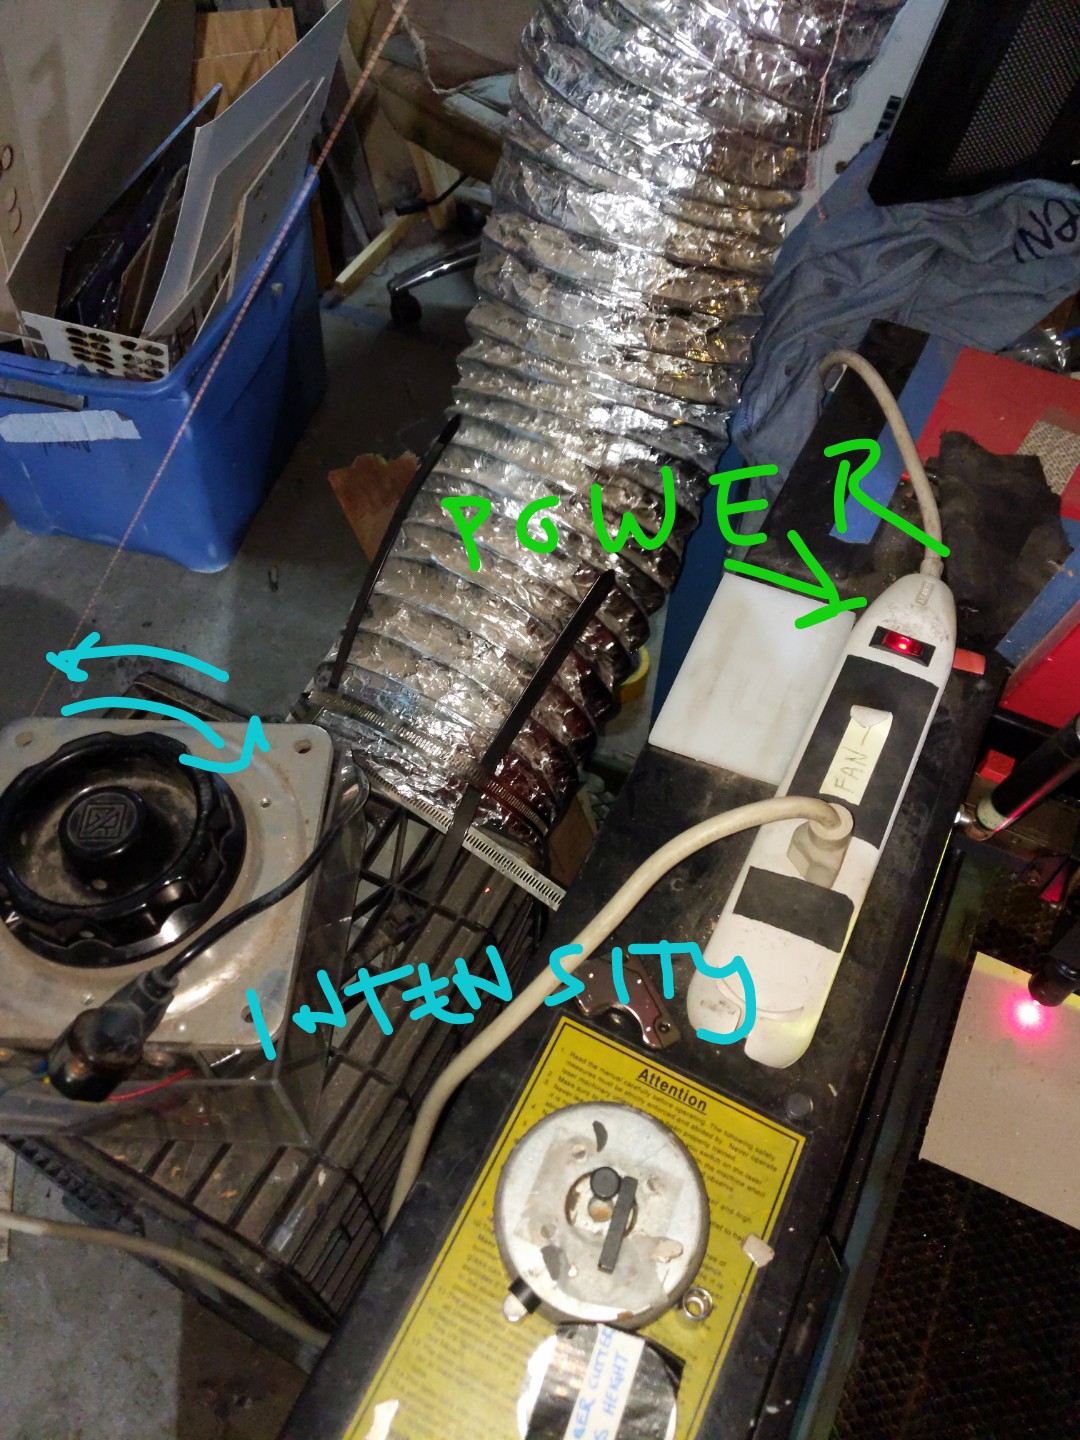
Exhaust fan for laser cutter
Showing laser switch on
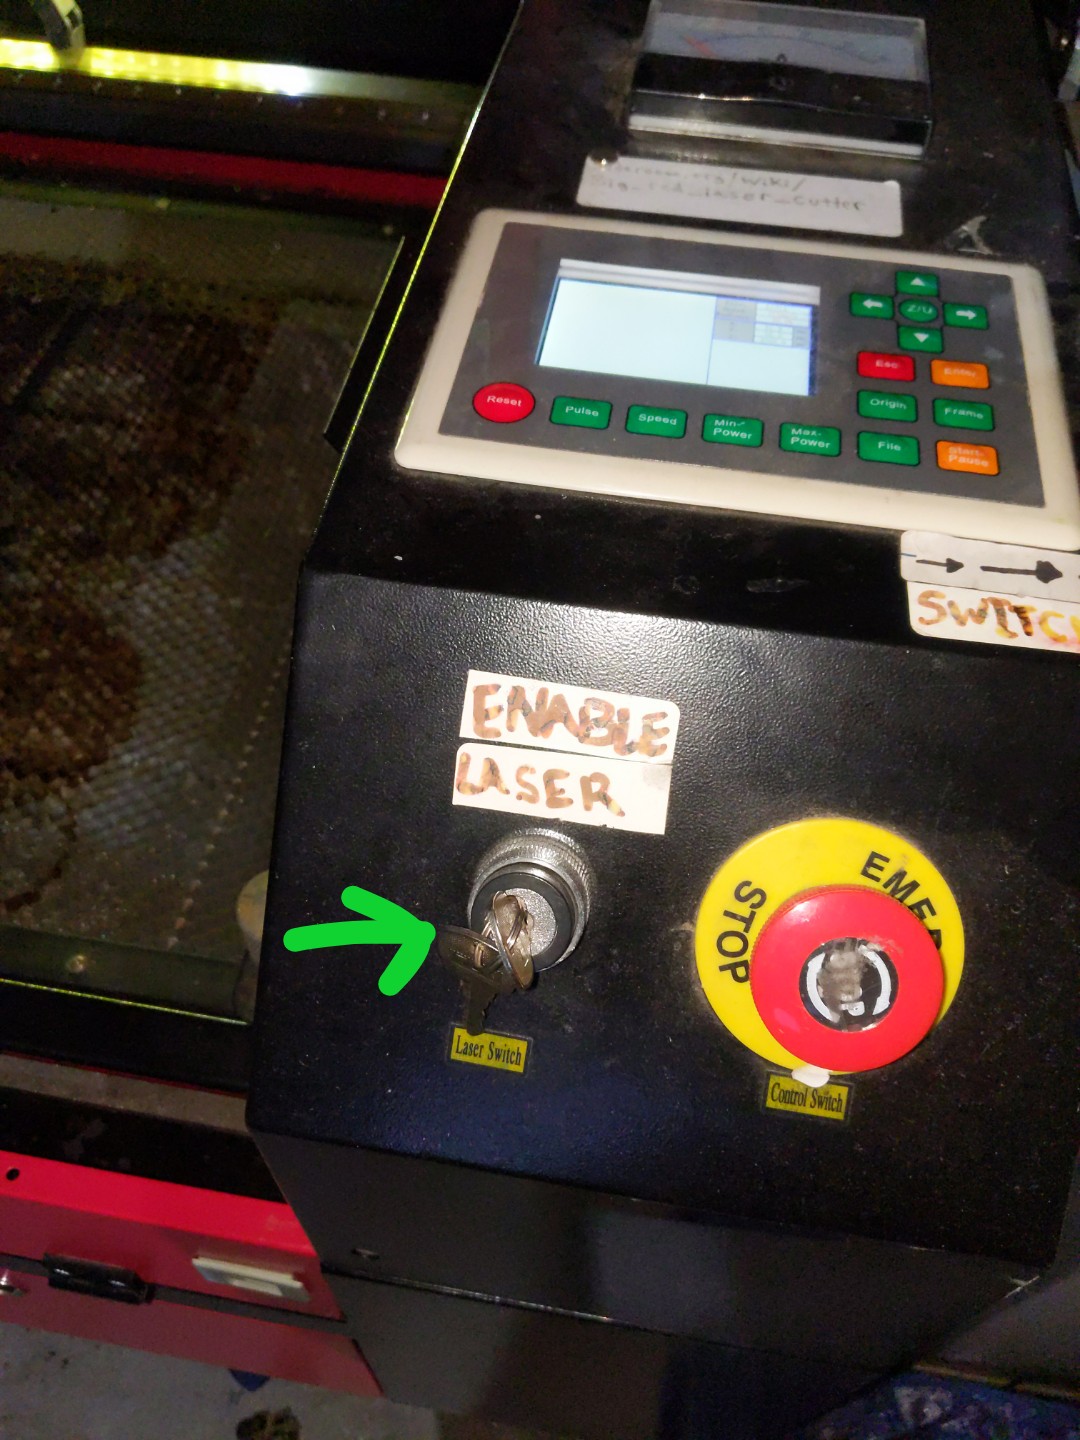
Showing laser key switch on (turn clockwise)


Preparing the file

The following steps should be done on the computer near the laser cutter, which has LightBurn installed on it.
- Open LightBurn on computer next to the laser cutter
- Import a vector file (svg, dxf, pdf, etc.), raster image, or create a design in LightBurn.
- Set the color of items to define how you want them cut or engraved, then double click the colors in the pane on the right to set the laser speed, power, and other features associated with that color. Black can be used to cut and red to etch, for instance. Use this chart to get a ballpark reference for speed and power settings: Big red laser cutter settings. It is recommended to do a "test cut" before cutting out a large file to be sure your speed and power settings are good.
- Select "absolute coordinates" to define the placement relative to the bed. Select "user origin" to set the placement on the bed manually. The device should be set to ttyUSB0, Ruida664GX.
- Once happy with design, click “Send”
- Enter a name (or just use default to override) and press enter.
- Wait for the file to send.
Running the laser
The following steps should be done using the control panel on the laser cutter itself.
- On the laser cutter control panel, press "File" to see available files.
- Scroll and press “Enter” to select a file.
- Set the origin if necessary.
- Press “Frame" to confirm placement. When you press this, the laser cutter head will trace around the max coordinates, to show you where your design will be cut.
- If the frame is correct press “Start”, and the laser will run.
Having Trouble Setting the Origin?
If you are using LightBurn to compose your project, be sure to use the setting "Current Position".
Otherwise, LightBurn may override any origin you set at the laser cutter.
Setting the origin on the laser cutter is easy.
On the front panel there are 4 arrow keys. You can use these to move the "head" around.
Pressing the "Origin" button sets that spot to be the origin of where cutting starts. Typically, this is the upper left
of the bounding rectangle around your artwork.
You may find that moving the "head" is much easier than moving the material placed on the bed!
Cleaning
Lens & Mirrors
Very carefully. Clean the lens and mirrors monthly.
Exhaust Fan
If the exhaust fan is not working well, it might need to be cleaned.
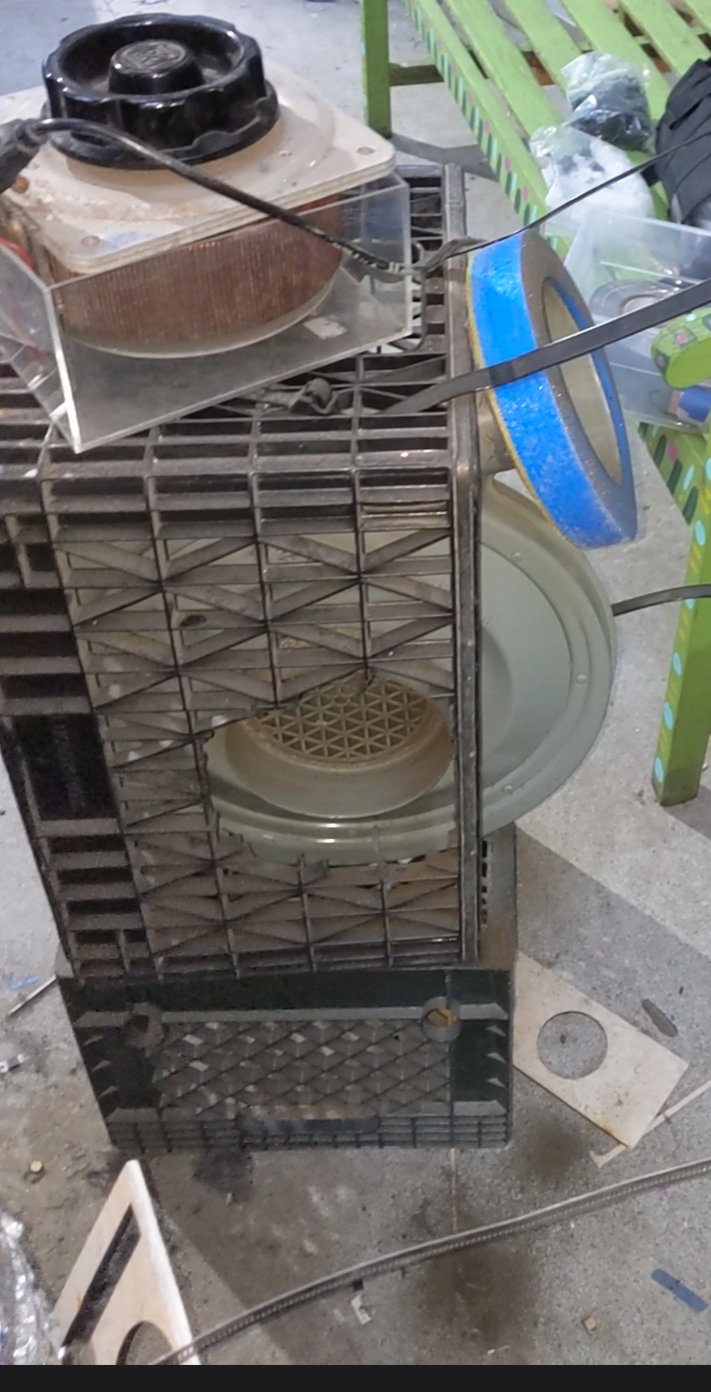
To clean, detach the fan and base from the laser cutter. The green area circled in the below picture is where you need to get access, the intake.
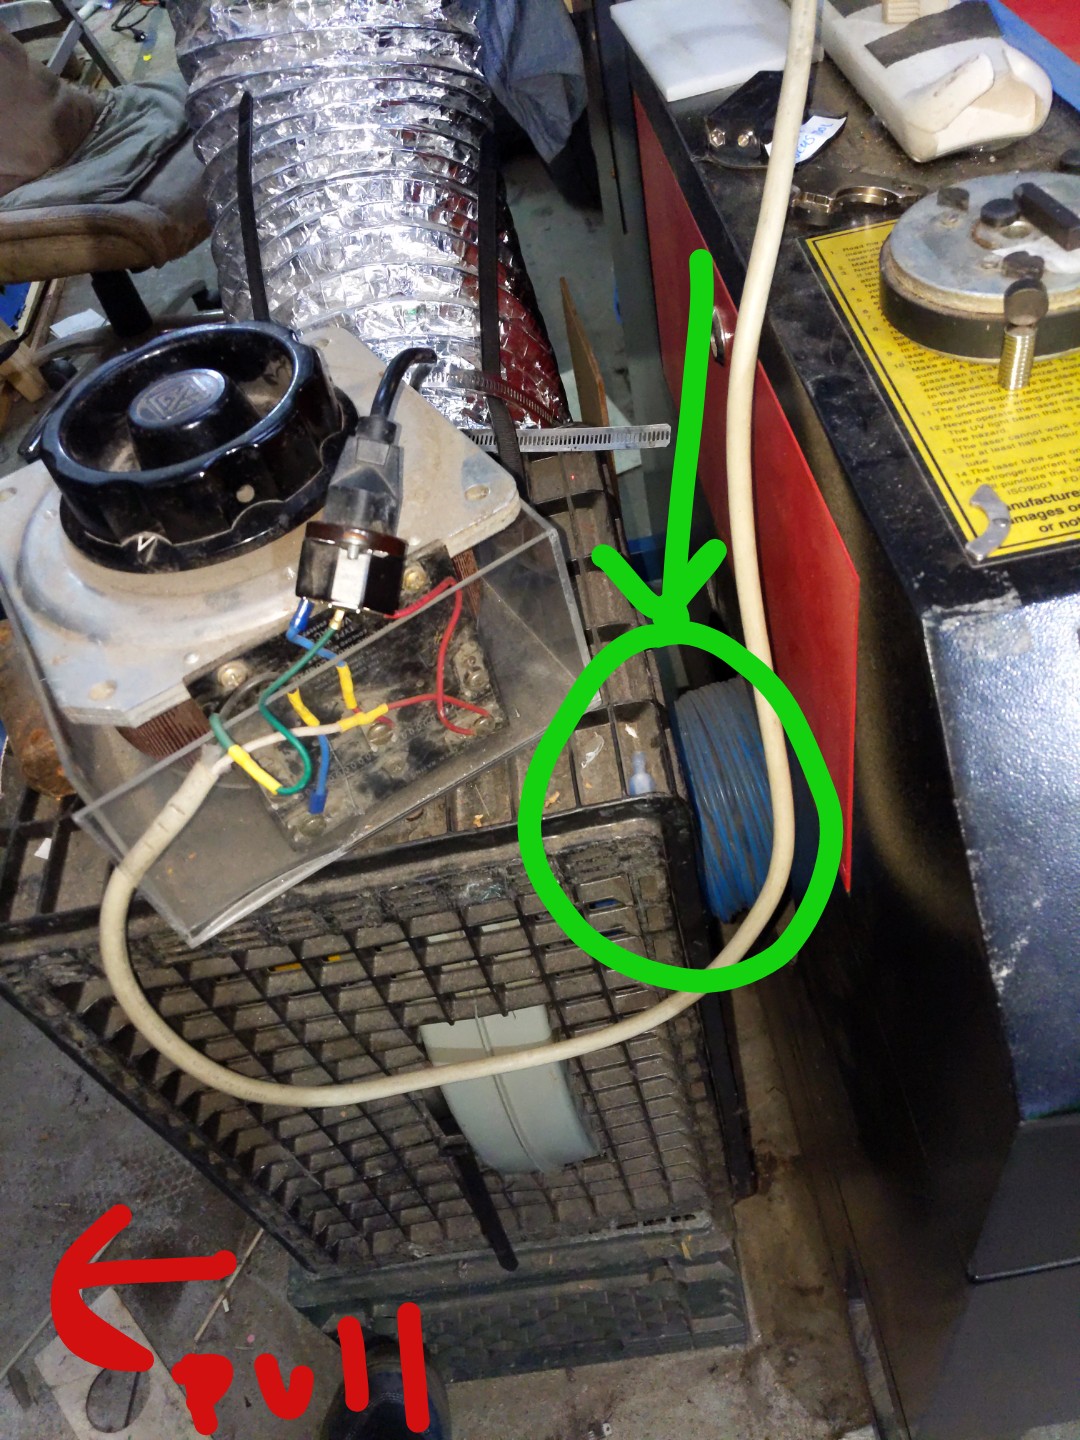
Pull the milk crates away from the laser cutter, disconnecting the intake from the blue ducting
This is what the fan looks like with intake oriented towards you
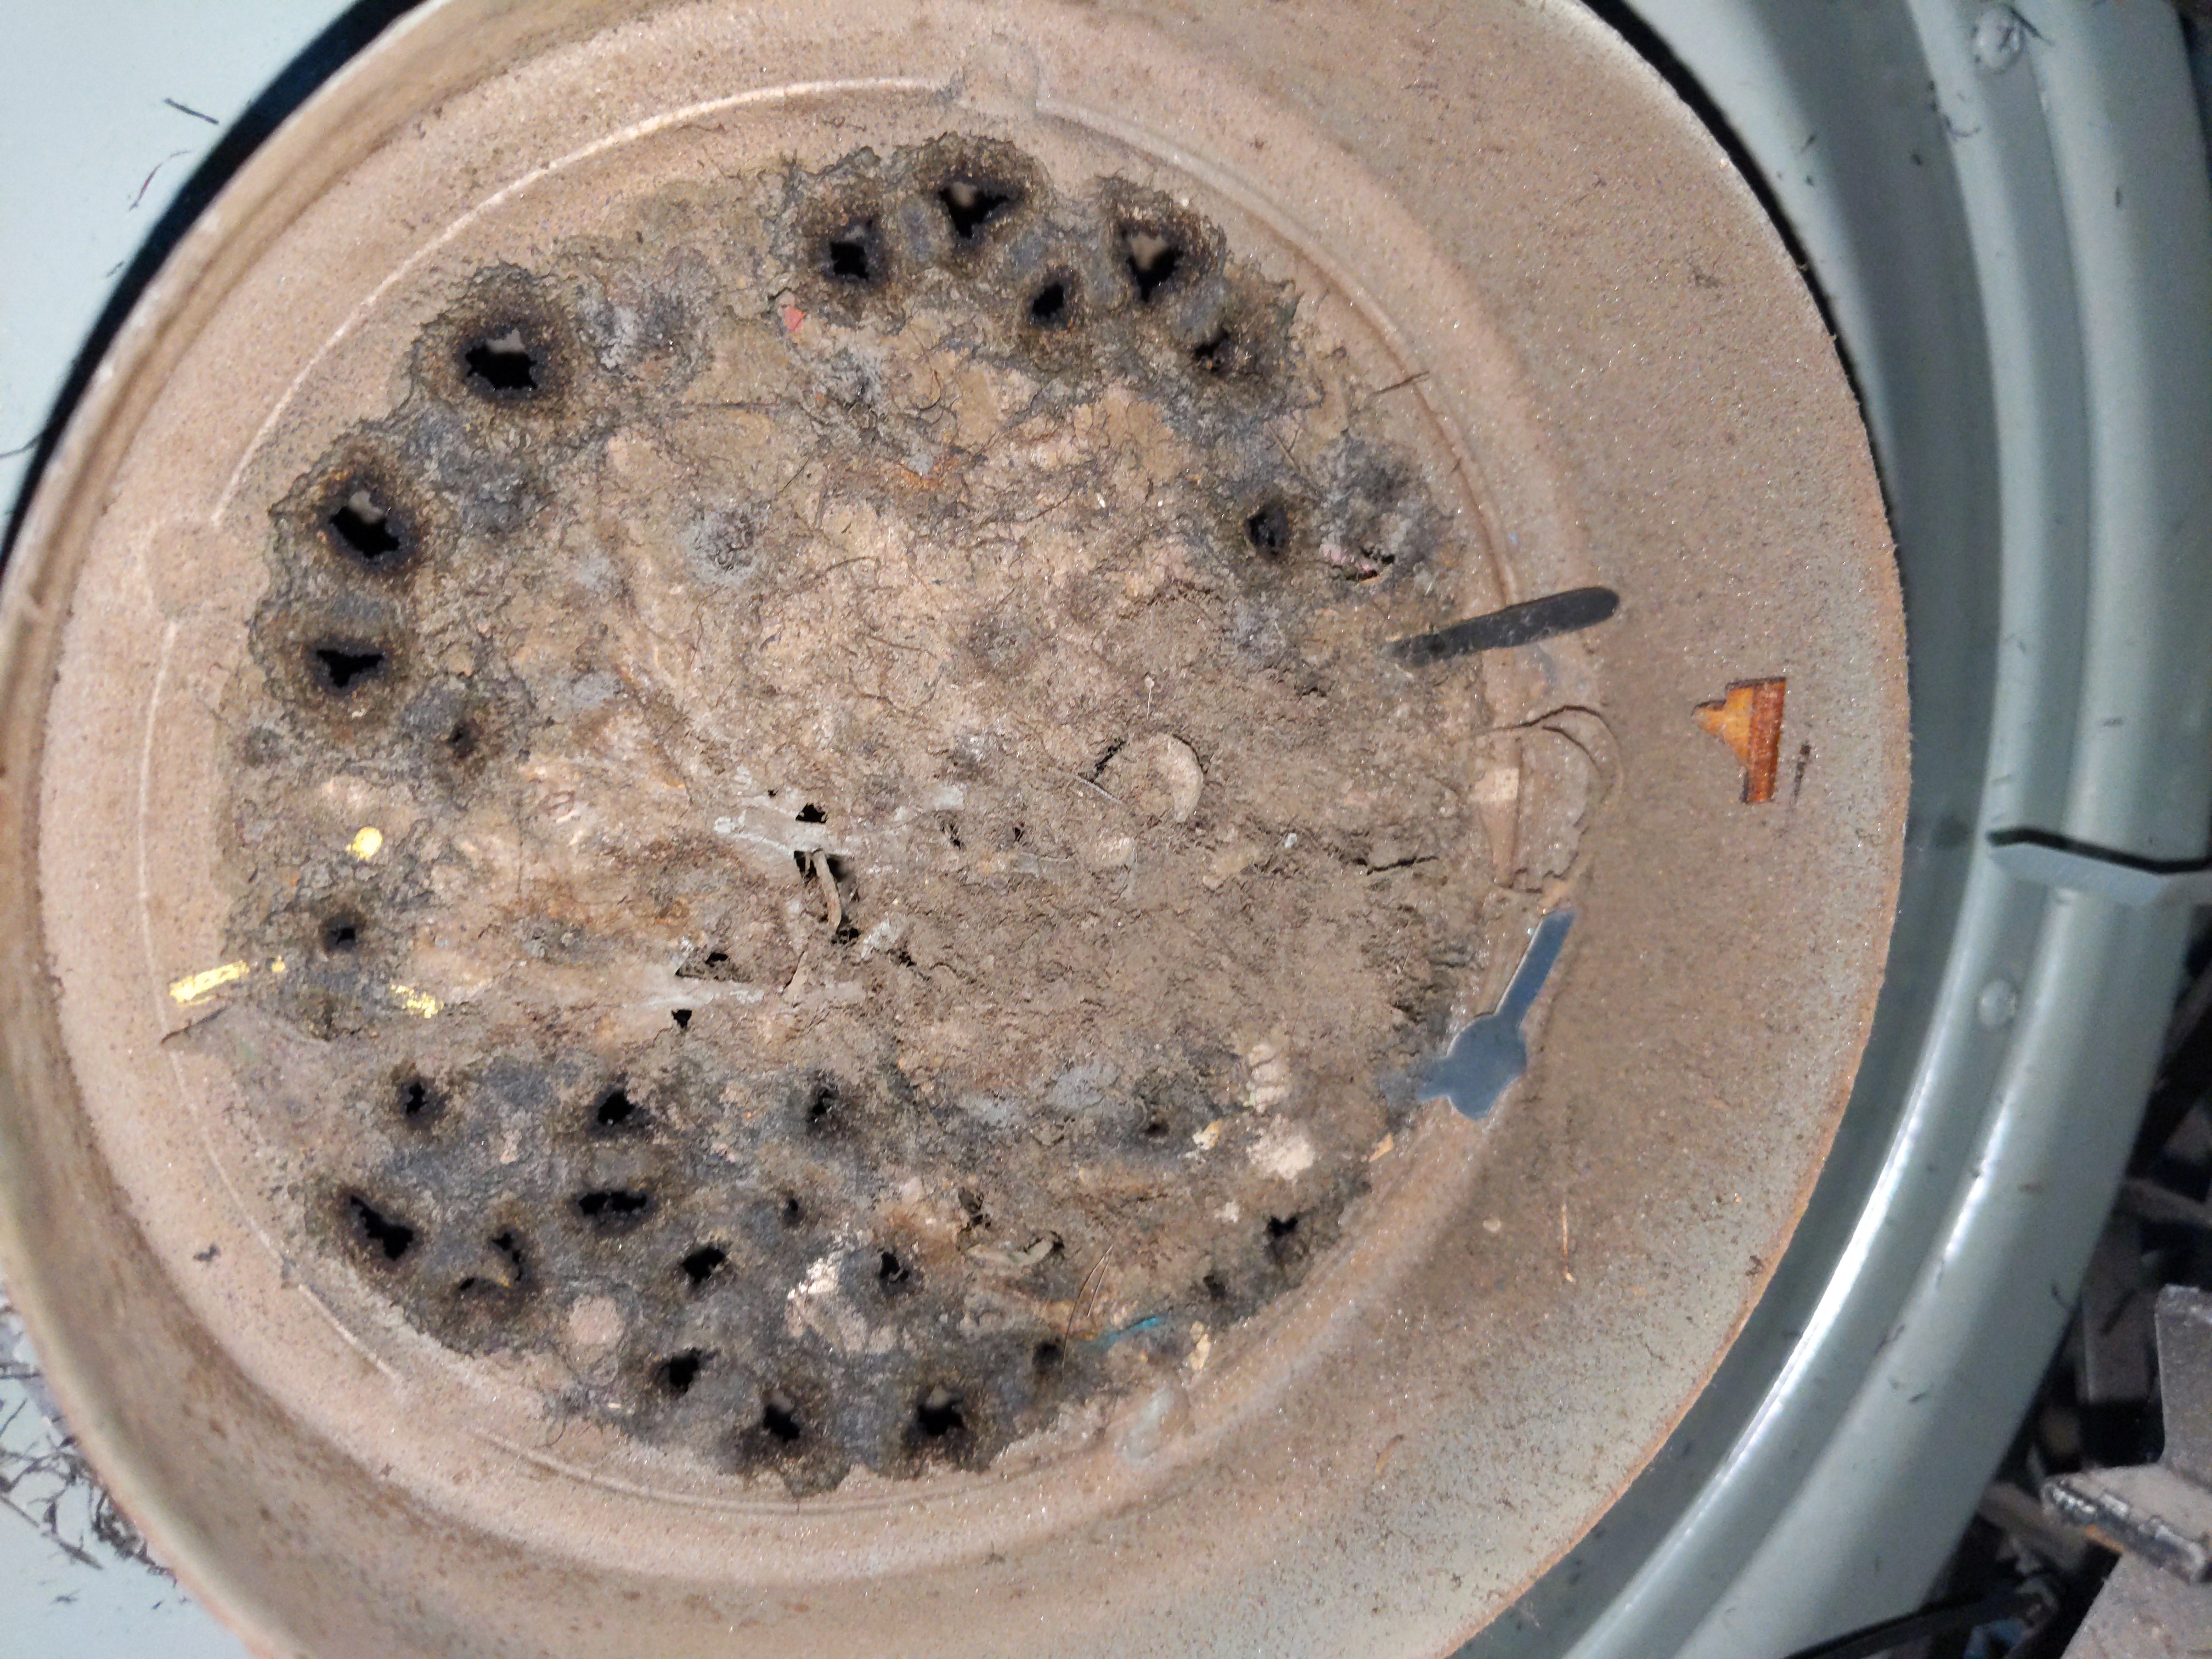
Dirty exhaust fan intake, an N95 mask is recommended, use a vacuum and toothbrush/wire brush to clean.
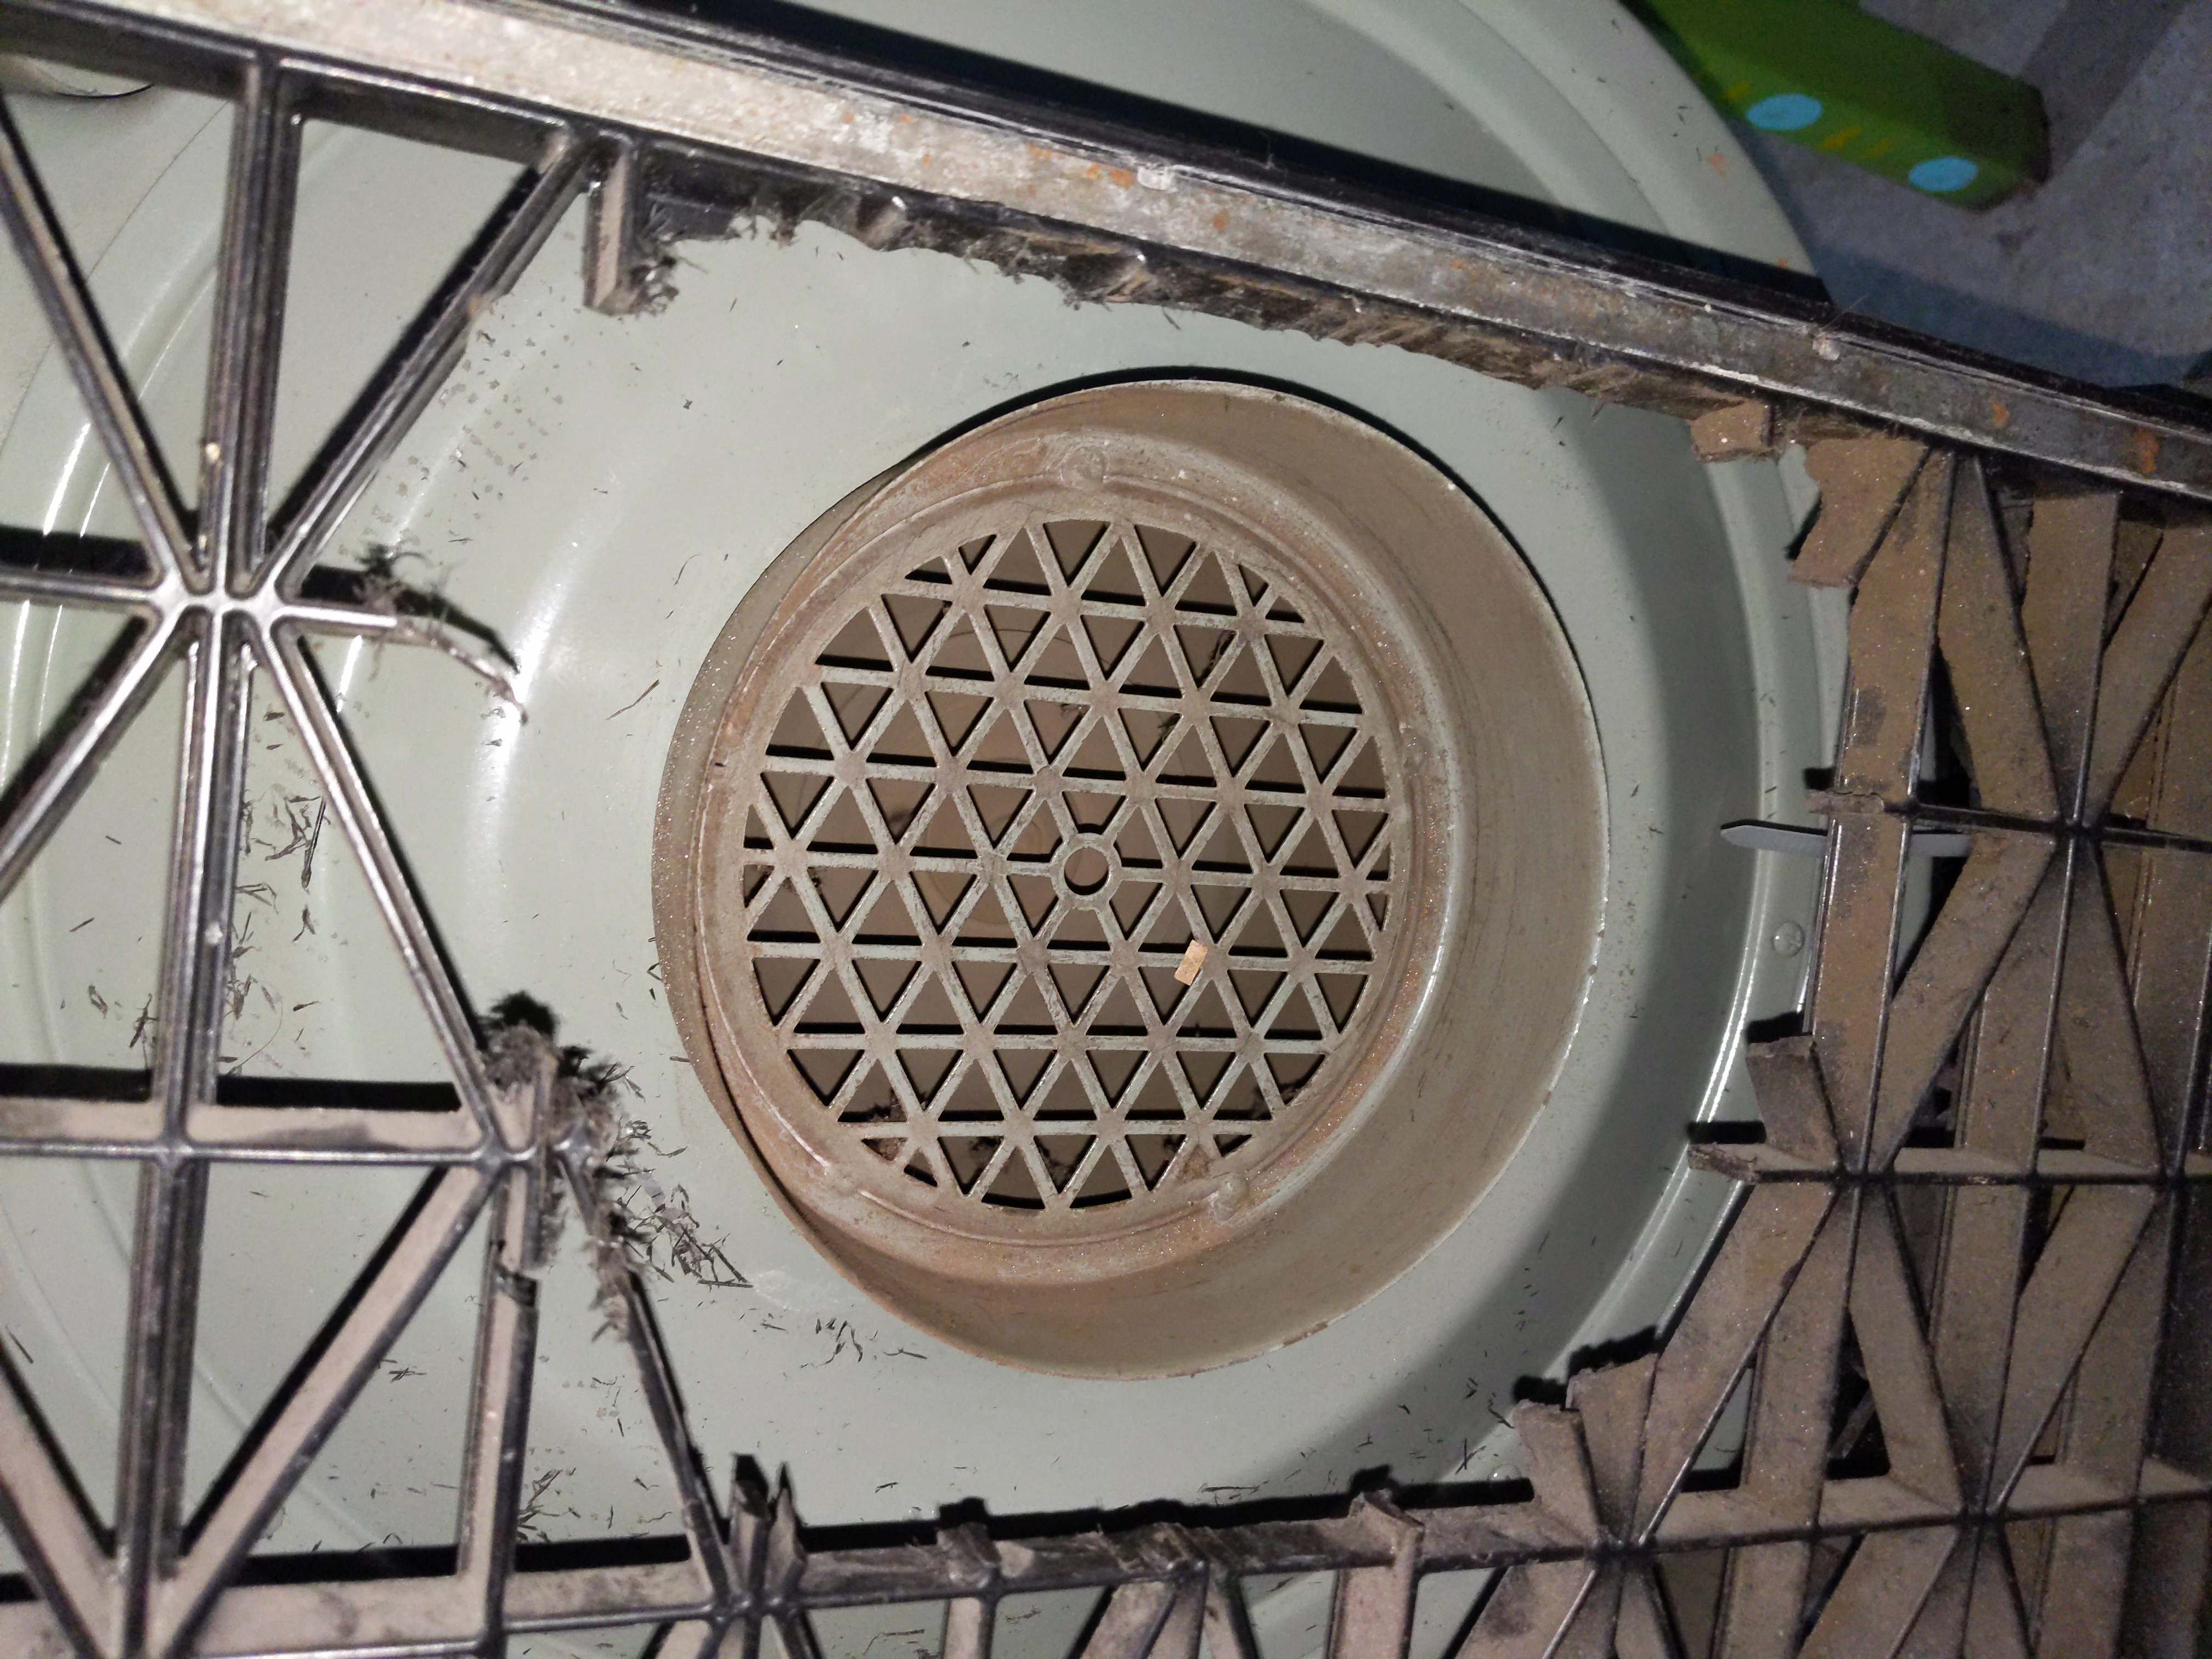
Clean exhaust fan intake


Other software
As mentioned, RDWorks can also be used. We haven't tried it yet but it seems it's a free download from here.
Some of the software (downloaded from the above link) is on the hard drive of wasp.local which is a desktop computer under the 3D printer desk, in a folder called ~/laser-backup/
The above software has also been downloaded and stored here
It was setup with an IP address of 100.64.64.69 (by pressing buttons through the menu) but it had no ports open and then we just switched over to USB to the computer and it was working fine. The same software might work over ethernet but we didn't try.
Trying other things
Andy is trying to find software to control the laser cutter. I can generate gcode instructions in Inkscape, but I don't know how to send them to the printer over USB.
I'm trying to install [1].
I ran the commands here: https://laserweb.yurl.ch/documentation/installation/36-install-raspberry-pi. But the server gave an error when started:
Server binding to all local IP addresses on port: 8000
internal/modules/cjs/loader.js:818
  throw err;
  ^

Error: Cannot find module 'node-hid'
Require stack:
- /home/laser/Programs/lw.comm-server/server.js
    at Function.Module._resolveFilename (internal/modules/cjs/loader.js:815:15)
    at Function.Module._load (internal/modules/cjs/loader.js:667:27)
    at Module.require (internal/modules/cjs/loader.js:887:19)
    at require (internal/modules/cjs/helpers.js:74:18)
    at Object.exports.LWCommServer (/home/laser/Programs/lw.comm-server/server.js:168:13)
    at Object.<anonymous> (/home/laser/Programs/lw.comm-server/server.js:4141:13)
    at Module._compile (internal/modules/cjs/loader.js:999:30)
    at Object.Module._extensions..js (internal/modules/cjs/loader.js:1027:10)
    at Module.load (internal/modules/cjs/loader.js:863:32)
    at Function.Module._load (internal/modules/cjs/loader.js:708:14) {
  code: 'MODULE_NOT_FOUND',
  requireStack: [ '/home/laser/Programs/lw.comm-server/server.js' ]
}
|
Stuff made on the big red laser cutter
- I cut some 1/4" clear plastic suspected to be acrylic. Used 0.5mm/sec 100% / 40% power. It cut all the way through but the edge was rough.
Stuff seen around the space
Ventilation ducting
History
A plastic adapter was 3D printed to connect the 6" outlet of the exhaust fan to the 8" flexible duct leading to the roof hole:
laserduct.scad
THICKNESS=1.5*25.4;
ID=5.75*25.4;
ID_LIP=ID-(0.25*25.4);
ID_LIP_THICK=0.2*25.4;
OD=7.75*25.4;
OD_LIP=OD+0.2*25.4;
OD_LIP_THICK=0.2*25.4;
difference() {
  color("BLUE") cylinder(d1=OD_LIP, d2=OD, h=THICKNESS, $fn=100);
  {
    translate([0,0,ID_LIP_THICK]) cylinder(d=ID, h=THICKNESS, $fn=100);
    translate([0,0,-0.5]) cylinder(d=ID_LIP, h=THICKNESS, $fn=100);
  }
}
|
Also the duct/roof interface was improved and a new stand was made for the extractor fan. Yay for milk crates!
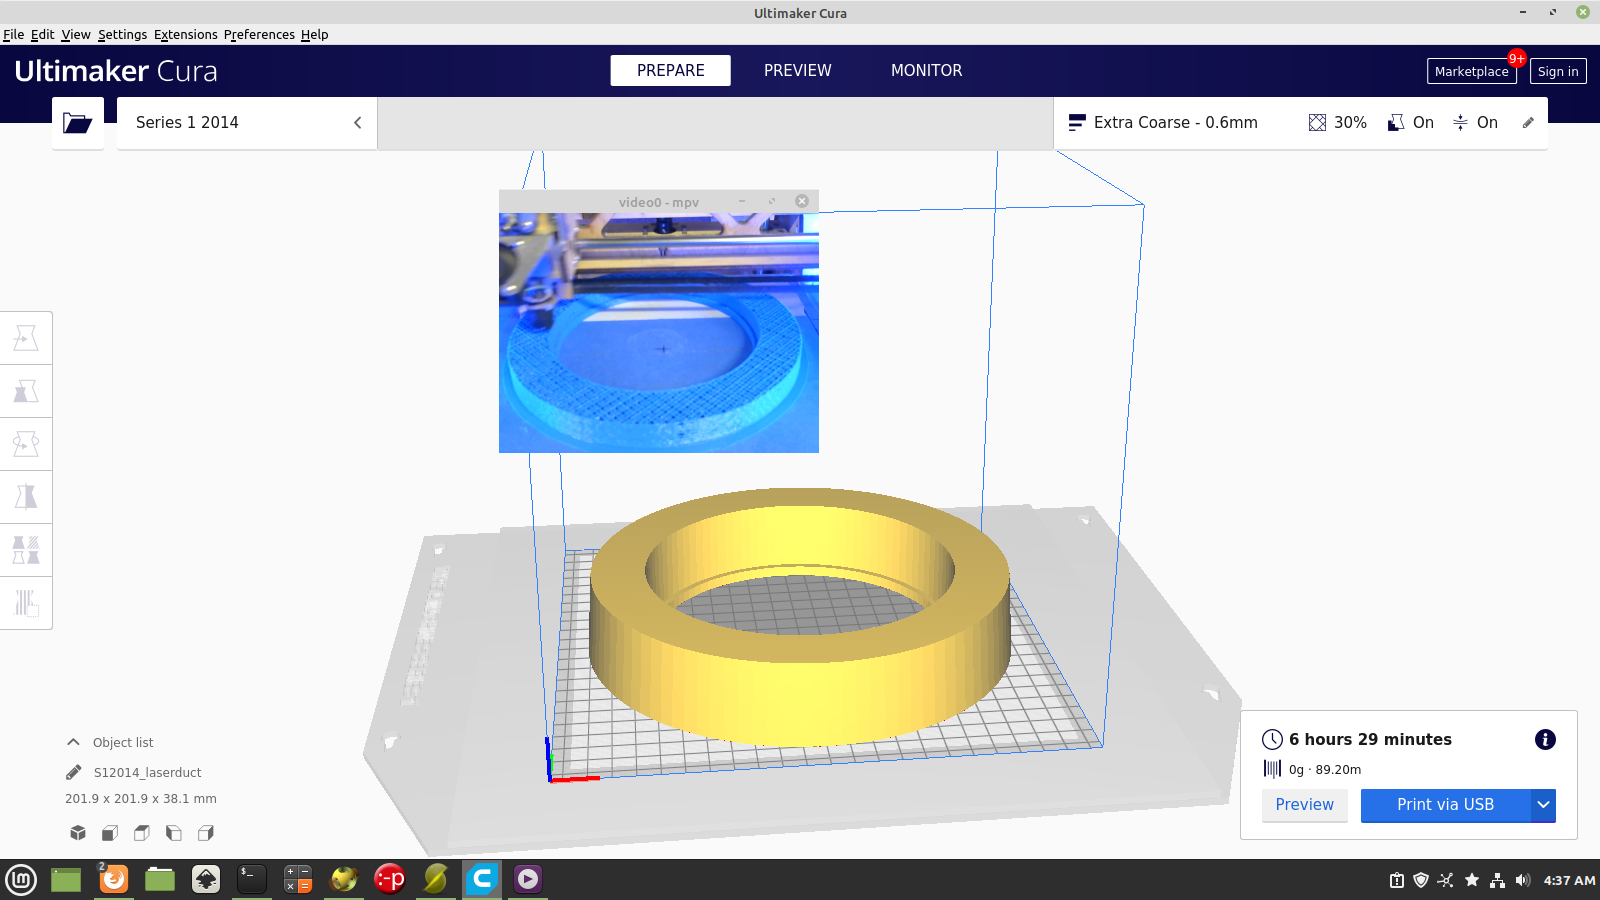
3D printing exhaust duct adapter

Inside
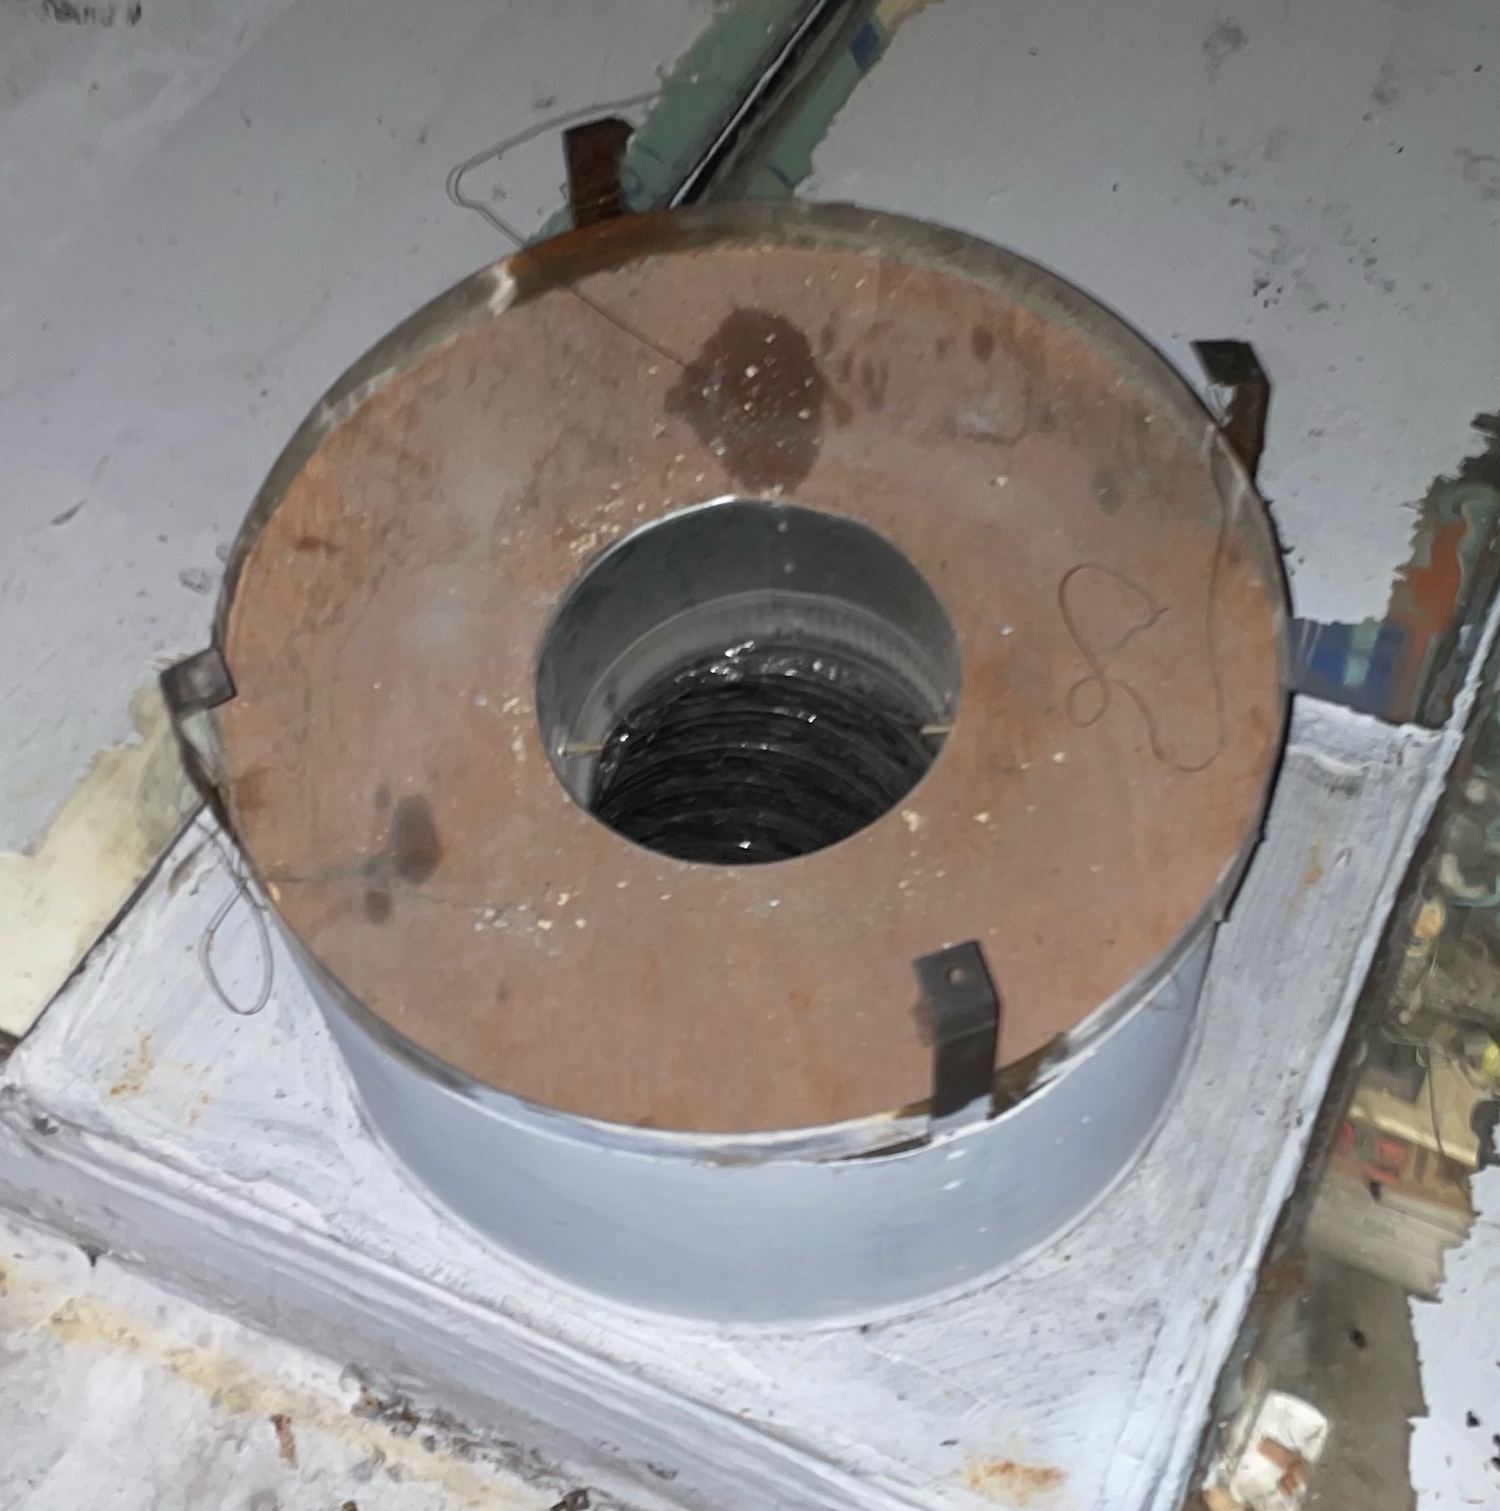
Outside


